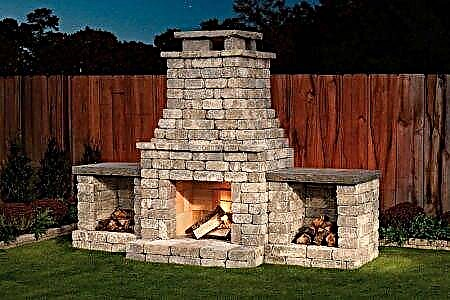
A fireplace is a stone or brick structure in the wall, resembling a niche, has a chimney for the output of combustion products into the atmosphere.

It is used as an element of the interior or for the purpose of heating a room (together with the main sources of heat).
It is advisable to design and build a fireplace between two internal walls. During the construction of a fireplace, draft (active air circulation) is formed in the walls near the window, which contributes to drafts in the room.
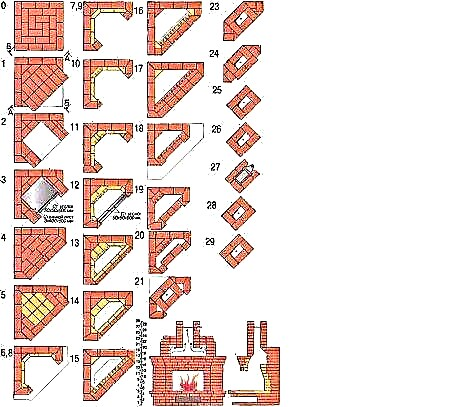
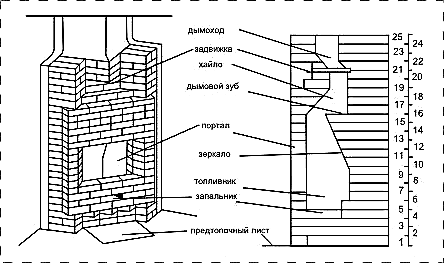
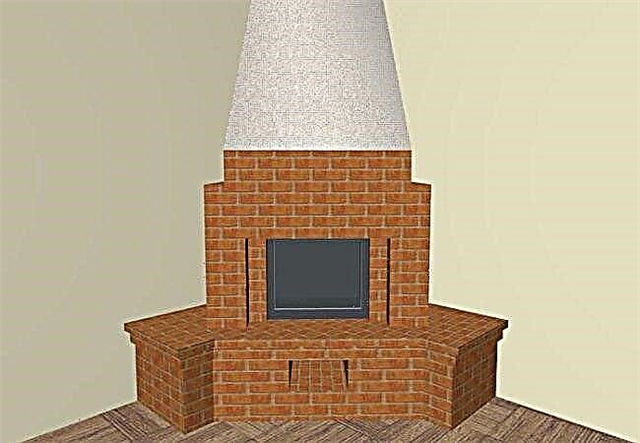
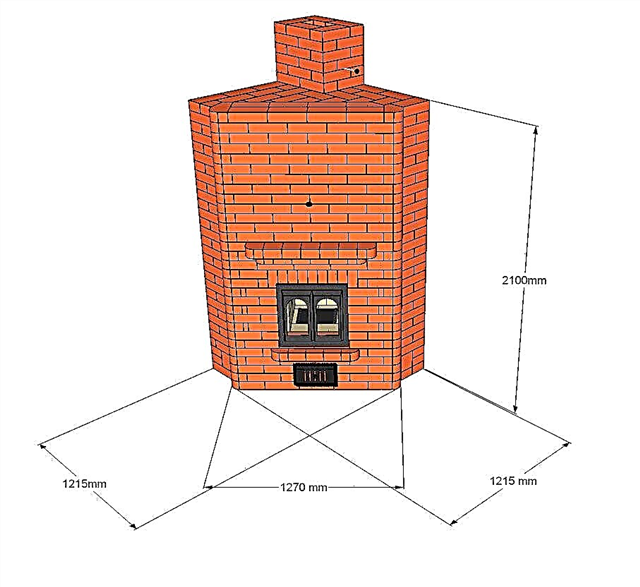
Design and drawing of a corner fireplace
To calculate the optimal size of the fireplace, you should determine the volume of the room, then create the following drawings:
- sectional construction
- drawing of each individual row,
- Sketches of the design of the facade of the fireplace.
If a room volume no more than 15 square meters, the area of the fuel hole will be 0.3 sq.m. Firebox dimensions (niches that are laid out from refractory bricks) are determined by the proportions 2: 3 (height to width). That is, with a fuel opening area of 0.3 sq.m. the dimensions of the firebox are 56x40 cm. The optimal size firebox depths - 0.5-0.3 to height, that is, at a height of 56 cm, the depth of the firebox is 25-29 cm. Smoke hole size calculated by the ratio of 1/10 - 1/15 of the area of the firebox. For a square pipe this will be - 14x14 cm, for a round pipe - 10-13 cm (diameter). The height of the pipe is about four meters (the pipe should protrude 30-50 cm above the highest point of the roof).
The side walls of the firebox are intentionally laid out with an inclination (the inclination increases the heat transfer by increasing the draft in the fireplace).
A special protrusion is built above the firebox to prevent soot from falling down from the pipe, and also to prevent smoke and cold air from entering the room (smoke tooth).
With proper construction of the drawings, it becomes possible to individually calculate the number of bricks.
Additionally increases the heat transfer lining (steel or bronze plates) of the walls of the fireplace.
Materials for construction
For construction, it is necessary to prepare:
- refractory brick (quantity according to the drawings, brand not lower than M200),
- sand (fine fraction),
- refractory clay,
- crushed stone (2-6 mm),
- Portland cement,
- fittings and steel corners,
- smoke damper
- a spark catcher (nozzle for protection against fire in the form of a cone) and a deflector (for protection against wind and increased traction) for the pipe,
- grate,
- screen,
- waterproofing material (for example, roofing material),
- level, hammers, trowel,
- facing materials.
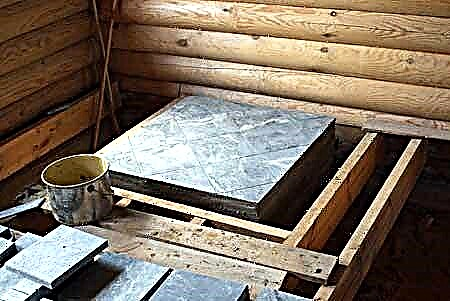
Fireplace foundation
The base of the fireplace is built independent of the foundation of the living room, taking into account the ceiling beams and rafters (the fireplace pipe should not be close to them). The width of the foundation is made more than the width of the first (basement) row by ten centimeters.
- A swarm of foundation pit with allowances of 10-15 cm (from the width of the foundation) with a depth of about 60 cm.
- We lay down and ram the crushed stone (layer 10-15 cm).
- We manufacture and install the formwork treated with bitumen or lined with a layer of waterproofing material at the bottom of the pit.
- Fill and level the buta layer (proportions: cement 1 part, sand 3 parts, crushed stone 5 parts). The buta level should be lower by the thickness of one brick than the floor level.
- We cover the foundation with polyethylene, leave for one week.
If necessary, the foundation is reinforced with reinforcement.
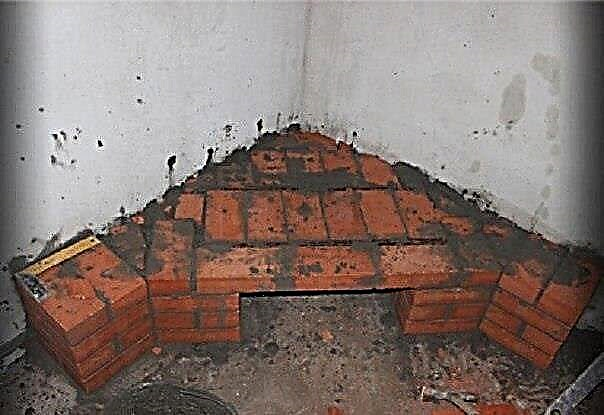
Masonry fireplace
Fireplace base (part located under the firebox)
- On a dried foundation we lay waterproofing material in two layers.
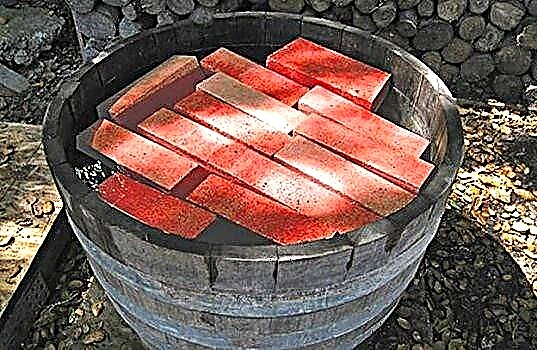
- The brick (without chips and cracks) is soaked in water for about three minutes, we prepare a solution.
- We grind the bricks (we lay them without mortar, then adjust the size according to the drawing).
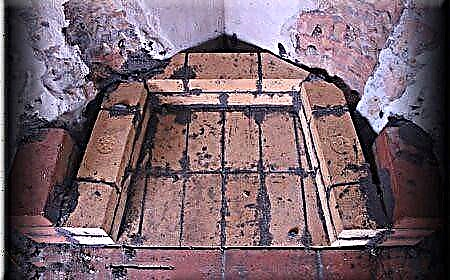
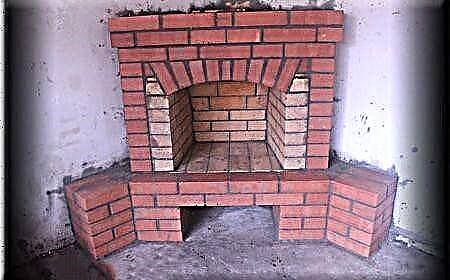
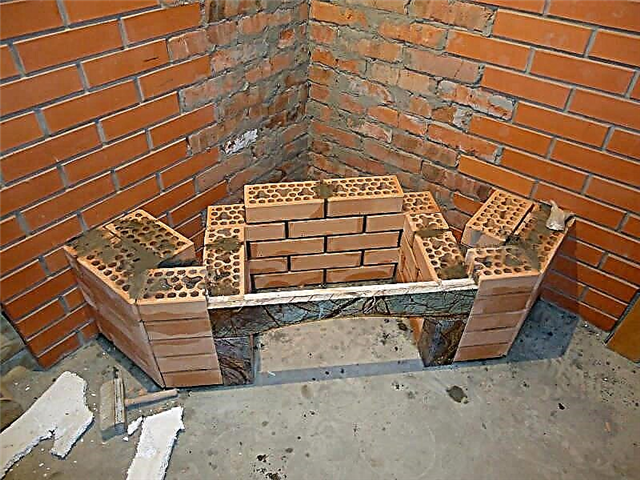
- The first (base) row of bricks is laid out with a continuous cloth, placing the bricks on the edge, in the next row we lay the brick flat, and a niche is made where a metal box for collecting ash is inserted. In the third row we lay out a layer of bricks, overlapping part of the ash box. The fourth row - laying the pan of the fireplace insert and installing the grate.
We form the overlap, laying out the fifth row with a slight extension of the bricks forward.
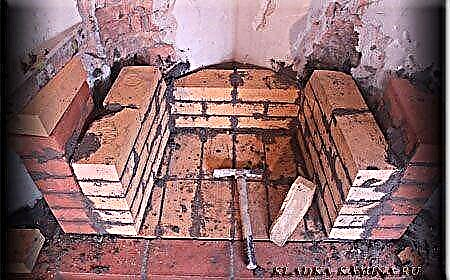
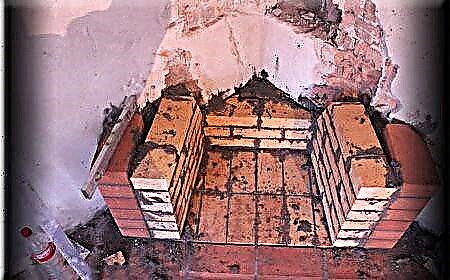
Fireplace laying at the fireplace
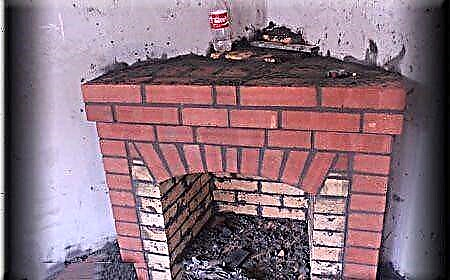
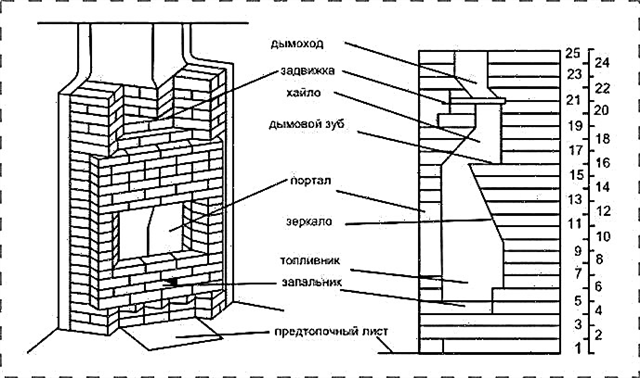
We spread the fuel chamber with a brick (6-9 row). As the masonry is checked, the verticality of the walls. Next, lay out the corners for the construction of the fireplace portal and continue to build the outer walls and firebox. In the 13-14th row, it is necessary to create the base of the mirror and complete it by the 19th row. To do this, either bricks are laid with a ledge of 5-6 centimeters, or they are placed bricks vertically with an inclination. In the 19th, 20th row we narrow the firebox, pushing the bricks a little forward.
Important! In order not to get confused, it is necessary to number each row of masonry with chalk.
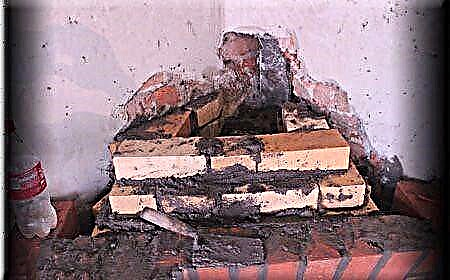
In the 21st row, we begin to form a protrusion with an inclination of 20 degrees - the kiln tooth (tooth construction continues in the 22nd and 23rd rows). 24 and 25 row - we are building a mantelpiece, the brickwork is straight. Next, we install the oven grill and lay out the chimney with a brick.
Important! When cutting bricks, use eye and respiratory protection from dust (construction glasses and a gauze bandage).
In the underground space or behind the wall of the fireplace, a blowing channel is built, which is necessary for air access and fuel combustion. A channel can be one or more.
Chimney and chimney
A chimney is a part of the furnace that resembles a cap in shape, inside of which passes a steel pipe (or chimney blocks made of ceramics), which passes into a chimney. The back wall is made vertical, and the side walls are tapering at an angle of 45-60 degrees. The internal section is calculated by the proportion: 0.1-0.15 of the portal area, and a height of at least five meters from the fuel combustion surface. The walls are made thick enough to reduce heat loss.
At a height of about two meters, a valve is mounted. The frame for it is fixed with a liquid solution in the masonry.
The first point of installation of the chimney is the installation of a block above the smoke collector. Cement mortar connect the holes of the pipe and smoke collector. Brick lining is attached to the pipe by means of anchor joints inserted between the external blocks of the pipe, which are closed into the joints between the bricks. Internal surfaces must be free of gaps.

The head of the pipe is not less than 1 brick thick. To reduce the accumulation of condensate in the chimney duct and to prevent the ignition of structures, thermal insulation and thermal insulation are installed.
Fireplace components:
- Chimney for the fireplace.
- Support plate.
- Fire plate.
- The pipe drive section to the chimney.
- Firebox.
- To exit the hot air, a ventilation hole with a grill is mounted.
- Decorative element and thermal insulation layer.
- Ventilation grill.
- A chamber with hot air, a ventilation grill, the outside of the chamber is decorated with stone, marble and other material.
- Facing.
- The movement of cold air.
A spark catcher and a deflector are installed on top of the pipe. The function of the spark catcher is fire safety. Structurally, this part is similar to a blind metal cone with a wire mesh on all sides. The deflector is mounted on the head in order to increase traction and protect the pipe from the wind. Usually the cross section of the deflector is round.
Facing the fireplace and the protruding part of the pipe
If it was planned to leave the outer part of the fireplace with a brick, without additional cladding, then the masonry should be as neat as possible, and the solution should not be brought to the front of the fireplace by 0.5 cm, so that it remained possible to expand the seams.
If the masonry requires additional decorative cladding, then use artificial or natural natural stones, ceramic tiles, tiles and other materials. Top stones are recommended to be varnished to improve their decorative properties and facilitate care.
The cheapest and easiest way of facing, which is produced after the shrinkage of the masonry occurs, is plaster. Using various spatulas, plaster creates a variety of decorative effects. It is possible to color the plaster.
Another popular way of facing a corner fireplace is to use drywall. It is cut and mounted on a special metal frame, strictly checking the corners and walls with a level.
DIY step-by-step technology of laying a corner fireplace with your own hands - photo report of brick ordering


Do you like the article?
Save so as not to lose!
Project preparation
To build a corner fireplace with your own hands, you need to develop a series of instructions that will determine the progress of work. Such instructions are called a project. It includes a description of the model, tools and materials used, drawings of the fireplace in different planes, as well as a detailed diagram of the masonry of the fireplace body.
Ready-made projects, which were developed by professional craftsmen, allow you to build a fireplace of any complexity. To use them, you need to choose the option that is suitable in appearance and performance. Many resources that specialize in fireplace and stove masonry provide paid projects for a personal order.
Self-preparation includes calculations of the main dimensions of the fireplace. Oddly enough, but these dimensions do not include external dimensions. We list the basic requirements that apply to the device.
- For efficient combustion of fuel and ensuring the output of products, a pressure difference in the chimney is required. Good traction is a direct indicator of the correct execution of all installation work.
- The functions of heating the fireplace should provide sufficient heat to ensure that the room is filled with heat for an hour.
- The generated heat should be directed into the room, and not removed through the chimney to the outside.
The implementation of all these requirements is possible with a competent combination of the size of the fireplace insert with the dimensions of the heated room. There are ready-made tables in which the parameters of the furnace are indicated, which according to some mathematical formula depend on the linear dimensions of the room. It is necessary to select the most suitable value of the area and use the tabular data. If this is not possible, then all the calculations will have to be done independently.

To calculate the basic dimensions, you need to remember a few elementary formulas. The area of the furnace hole = room area: 50. In the strict sense, this formula should establish the dependence of the area on the volume of the room, because the height of the room significantly affects the amount of energy for heating. The indicated calculation option assumes a certain power reserve.
For the specific size of the fireplace opening, you will have to solve a simple equation and choose the height and width, which in a fractional ratio are determined by a ratio of 2: 3. The specific results obtained are used in calculating the depth of the furnace, which is 2/3 of the height of the opening.
The next node to be calculated is the chimney. What matters here is not so much its length as the size of the part protruding above the roof. With sufficient distance from the ridge, use the following rule. The line drawn through the ridge and the upper point of the chimney makes an angle of 10 ° with a horizontal line. Naturally, such a principle will give very approximate results, since there is no way to measure this angle accurately without special devices.
Material preparation
The preparation stage determines the pace of subsequent work. If you carefully prepare for the construction of the fireplace, then all other work can be performed without distraction. As a material necessary for the construction of a fireplace from a brick with their own hands, a red refractory brick is used. But the furnace itself, where the direct burning of firewood will take place, is covered with fireclay brick. In addition, you can make a list of additional materials.
- Ruberoid, it is necessary to provide waterproofing of the foundation.
- Reinforcing mesh or other suitable foundation material.
- The metal corners providing overlapping of a fire chamber.
- Sand, clay, cement or ready-mix for laying stoves.
- Chimney gate and blower door.
- Materials for exterior decoration.
For the construction of different parts of the fireplace requires a different composition of the solution. The foundation is poured with a solution of cement and sand. The proportion of cement here can vary from half to a quarter. The laying of the firebox and the fireplace body does not imply the use of cement. Clay and sand in fractions 1 and 3 respectively form a refractory composition. During the construction of the chimney, cement and lime are added to a similar solution.
Preparing a clay mortar is a whole art. First you need to choose the right clay grade with normal fat content. After this, the clay is soaked, crushed and mixed with sand. To save time, it is advisable to use the finished mixture. Even professional masters today no longer resort to self-preparation of clay-sand mixtures.
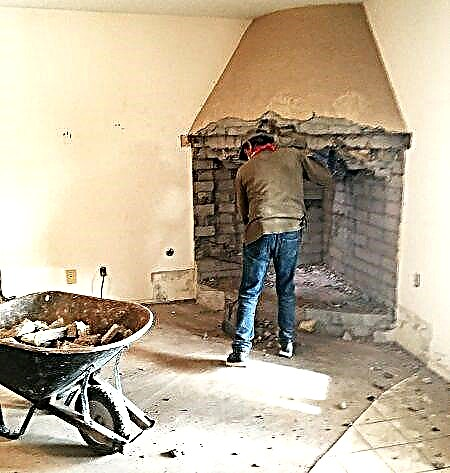
How to make a corner fireplace with your own hands simply and safely?

The construction of a cottage or a country house very often involves the construction of a fireplace. How best to make a good fireplace only with your own hands, without help, installation is planned in the kitchen, dining room or living area.
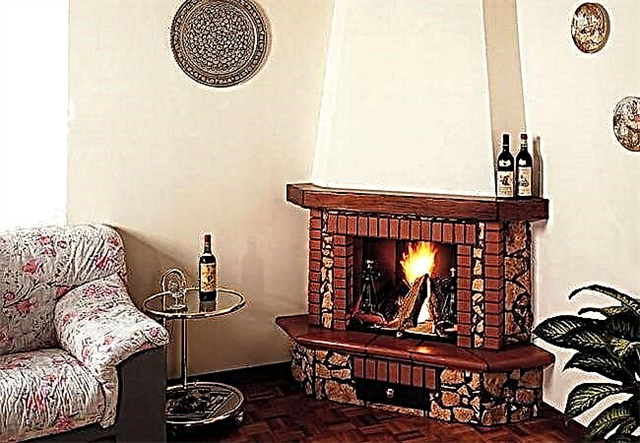
INTERESTING! The most successful way that will fill the building with home comfort is a classic fireplace, powered by firewood. As a decor it is possible to use ceramic tiles or brickwork.

A corner wood-burning fireplace needs proper placement. Then, in the end, he will delight the household, correctly fulfill the duties assigned to him. Features of accommodation in a private house:
- The best place to build a good corner and functional fireplace with your own hands is considered the wall, which is located opposite the window. It is also possible to install a fireplace near the outer surface, but in this case the heating function will be reduced,
- It is forbidden to place near windows, as well as close to quickly igniting fabrics, materials,
- if you need to use the fireplace area for culinary purposes, you will need to consider the location in close proximity to the main inner wall.
The design of the living space with angular fireplaces allows you to use the entire room to the maximum, while receiving significant savings in financial waste.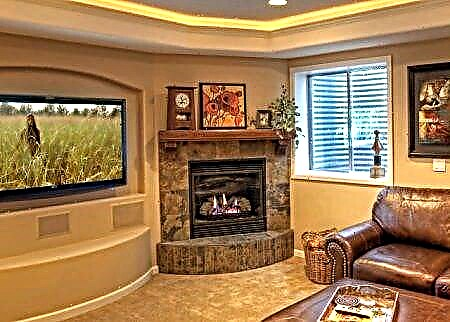
INTERESTING! Such designs are guaranteed to heat several living rooms, which reduces the cost of electricity, the purchase of firewood.
Corner fireplaces and their uniqueness
Of all the varieties of the fireplace design, the corner is considered one of the most relevant. Corner wood-burning fireplaces for the home are most often installed in a corner that is not used. This solution is not entirely profitable, since the heat will be distributed to neighboring empty rooms. Placing near the outer surfaces can lead to the loss of the necessary heat, because the fireplace will directly heat the street, and not the interior.
It is for these reasons that the most acceptable installation method is between deaf walls adjacent to each other. Thus, the correct circulation of warm air masses, heat efficiency is ensured.

The advantages of a brick fireplace with their own hands are:
- Attractive design
- many ways to decorate the surface,
- the ability to combine an element with various design concepts,
- significant savings in living space, funds for heating a private house,
- availability. The fireplace can be equipped with your own hands.
Subject to fire safety, conditions of construction and operation, corner fireplaces can become a luxurious highlight of the cottage, part of its home comfort.

Device fireplaces
How to make a corner fireplace with your own hands? First you need to understand its design features, that is, of what components it consists of. The most important elements are the firebox, portal and chimney. In addition to the voiced parts, the fireplace is difficult to imagine without a reliable and solid foundation. Let's take a closer look at all the internal components of the structure.

Fuel oil
The combustion chamber is considered the main component. In most situations, it is made of cast iron or heat-resistant metal. In the latter case, cast iron plates, fireclay or vermiculite are placed on the inside.

The lack of doors reduces the efficiency of the design. Therefore, closed fireplaces, for example, with a door made of heat-resistant glass, are currently popular.
Base

Fireplace base - a place that is located directly under the fuel chamber. Before its arrangement, it is necessary to place a two-layer waterproofing on the prepared foundation. For this, roofing cardboard with special impregnation or roofing material are suitable.
Portal
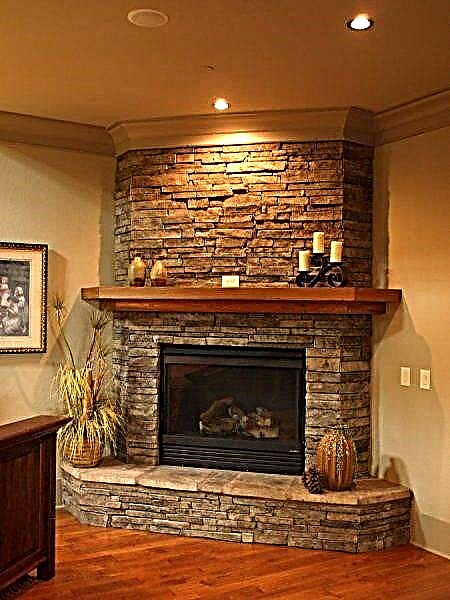
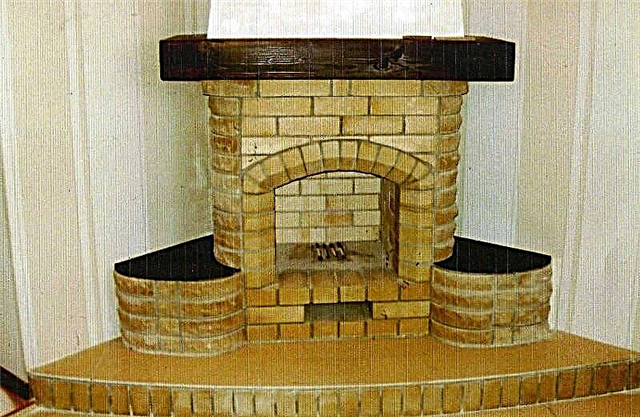
To build corner fireplaces with your own hands without facing will not work. The portal is considered the exterior of any fireplace, it demonstrates belonging to the design style. Nowadays, very often fireplace lining is made of expensive granite, tuff, steel modules. An actual solution is a mosaic of colorful glass, masonry, ceramic plates.
Design, drawing of corner fireplaces

A step-by-step instruction for building a fireplace with your own hands consists of drawing up a detailed diagram of a decorative element, selecting materials, laying the foundation and directly erecting the structure. We propose to dwell on each important stage in more detail.
The laying of corner fireplaces

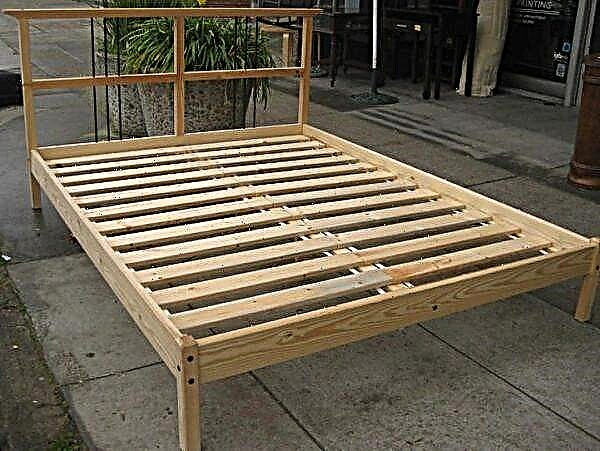
How to build a corner fireplace? Installation begins with the calculation of the first 3 rows of bricks. Be sure to comply with the features and modules of such masonry. Using the first row, the foundation is aligned to the level of the floor surface. For this, standard fireplace bricks are used: parameters 25 by 12 by 6.5 centimeters.
Between the elements, a seam is obtained, the dimensions of which should not exceed 5 millimeters. The first few rows serve as the fundamental foundation of the fireplace zone. They are laid out to the combustion chamber, after which the masonry continues according to the scheme, where the layering is indicated.
IMPORTANT! To increase fire safety, it is recommended to equip the firebox with a cast-iron door. Today, many designers advise to equip the door with heat-resistant glass, so it will be possible to monitor the flame.
During the construction of a decorative heating element, it is necessary to regularly check with the drawing. This will allow you to adhere to the sequence of work.

Video: interesting design corner fireplace "Annushka"
The corner fireplace "Annushka" is very popular among modern owners of cottages. It demonstrates a luxurious appearance that fits all design styles. Design features are discussed in the next video.
The construction of the corner design of the fireplace requires from the master specialized knowledge and skills. It is necessary to be careful and follow the developed design project, then the finished product will delight households for a long period of time.
Preparatory stage
Before proceeding with the construction, we will need to order the corner fireplace and a number of additional actions:

Arranging a corner fireplace requires careful preparation. At the first stage, you will need to prepare a high-quality and most detailed drawing scheme, on which all measurements, dimensions and other design features of your heating unit will be displayed.
In the absence of experience in the preparation of the plan, it is recommended to resort to the help of a professional or take an already completed project from this article or other Internet sources.
Location selection

The instruction or the so-called scheme should be made on the basis of the size and features of the place chosen for installation and placement.
Choose the largest and most spacious room, with good lighting, several windows and good ventilation.
Make sure that the selected viewing angle is as complete and beneficial as possible in terms of monitoring the focus and its operation.
Preparation and procurement of materials
After the scheme of the furnace is fully approved, it is necessary to put the main marks responsible for the width, height and depth of the structure on the walls and flooring. Then, if necessary, make certain adjustments.
Further, all the materials, mixtures, parts and accessories necessary for installation and construction are calculated. Since the work will be done with your own hands, purchase a brick and adhesive mixture with a small margin.
It is interesting to know: a fireplace stove whose angular ordering is made individually, despite the uniform principle of operation of all wood-burning installations, can have visual and design features, differences. For example, a hearth can be either open or closed. It can be laid out with a brick or purchased in an already assembled state. Such structures are made of steel and cast iron and are often equipped with refractory clear glass. For added convenience, you can equip your stove in the lower part with a roomy woodcutter or an ash chamber, in which all combustion products will accumulate, which is much easier to remove with this element. Niches and various shelves forming the shape of the structure form both a standard rectangular and elongated shape, and are made in the form of a triangle, polygon or trapezoid.
Outbreak size calculation
The ordering of the corner fireplace stove requires compliance with the exact dimensions and the specified parameters, which you will need to calculate yourself when creating an individual scheme. At this stage, we recommend using the following examples and rules:
- The diameter of the chimney should correspond to the dimensions of the main part of the structure only in this way you can create an optimally and correctly working draft,
- The power of the brick hearth is selected based on the total area of the whole house. The device must not dry the air. In this case, a correctly assembled furnace will warm up evenly and give off heat from all sides,
- The calculation of the optimal size of the combustion chamber is carried out as follows: the footage of the room selected for installation is determined, after which the obtained numerical value is divided into 50 units, the result obtained is the optimal size of this structural element.

The number of bricks and the size of the furnace
The size of the firebox is the area divided by fifty

Open hearth fireplaces are less effective
Example: an angular fireplace stove, the order of which is made by oneself, for a small room will have a furnace size ranging from 0.30 to 0.60 square meters from the size of the room.
Tip: if you want to get maximum power, with the optimal dimensions of your heating unit, we advise you to adhere to a ratio of three to two in relation to width to height.
Important: the power and functionality of the fireplace is also affected by such a parameter as depth. The calculation of this criterion is made so that the depth is not more than half or 2/3 of the height of the device. The efficiency of the furnace depends on how correctly selected dimensions of the combustion chamber are. A small hearth is not able to generate a large amount of heat, while for lighting a very large one, it will take a lot of firewood, and the heat generated will be very much, as a result of which it will be hot in the house and the air will become dry.
A photo selection in this article will help you decide on the shape and size of the corner fireplace.
Chimney size calculation
Arrangements of corner fireplaces must include not only the dimensions and features of the main part of the heating installation, but also its chimney. To calculate these parameters, use the following tips:
- As a basis for identifying the optimal parameters of the chimney, take a ratio of 1:10 with respect to the combustion chamber. When using pipes having a circular cross section, its size should be about 140-160 millimeters,
- For proper and complete operation of the draft, the total height of all the connecting elements, elbows and other parts of which the chimney consists must not be less than 5 meters.
The finished order of the hearth and chimney

Chimney shape to be any

If desired, the chimney can be lined with any heat-resistant materials
Tip: if you do not have experience in making calculations and creating schemes, a do-it-yourself corner fireplace can be created using special programs in which there is a simple functional and programmed action algorithm.
Procurement and preparation of materials
In order for the corner fireplaces with their own hands, the ordering was performed as accurately and correctly as possible, we will need to purchase and prepare the materials and the necessary tool in advance.
To create an additional foundation:
- Waterproofing materials (plastic film or roofing material),
- In order to fill up a dug pit and make a tamping, we need crushed stone having an average fraction and simple river sand,
- In order to build the formwork, simple boards or bars are used, which, if necessary, can be replaced with metal sheets,
- At the last stage, we need a reinforcing stack or rods. The diameter of this element is eight to ten.

To build a corner fireplace

Fireclay brick is bought with a small margin

For fixing and connecting together various elements
Materials for the construction of a fireplace and chimney:
- Masonry is done with red burnt and fireclay bricks. Red, is more budget, the main part of the building is being built from it. Fireclay is used to assemble the hearth, firebox and other areas exposed to the highest heating,
It is interesting to know: the calculation of bricks is made individually for each specific case, depending on the chosen scheme. On average, the construction of a corner model may require from 350 to 650 pieces (depending on size). To the resulting number of bricks, it is recommended to buy another 10 percent for the stock, in case of revealing defective, damaged, burnt elements.
- Brick is laid on the prepared cement composition (clay, sand and cement) in a ratio of 1: 3: 1. For laying chamotte brick, a special composition is used, with a high clay content and a lower content of sand and cement, since only clay is able to withstand high temperatures well and at the same time maintain the tightness of all joints and joints,
- Metal corners for connecting and fixing various elements together. The dimensions are selected as follows: 30 centimeters must be added to the width of the combustion chamber, after which the resulting numerical value is multiplied by two units. As a result, you need to purchase a fastener in sizes of 500 by 500 or 600 by 600 millimeters,
- To assemble a combustion chamber with a rounded arch shape, you will additionally need to prepare plywood from which the template will be made. And wooden slats will serve as a support,

- Fasteners for assembling a chimney pipe if it is not a brick but a metal one. In total, its length should be between five and more meters,
- Dampers, gate valves, screens and other elements necessary for a complete set of the hearth. You can either buy them in a specialized store or make them to order,
- Purchased hearth (if you do not plan to assemble this element from brick),
- Asbestos for insulation and sealing of wall coverings,
- Finishing materials (ceramics, tiles, natural and environmentally friendly minerals, artificial stone, decorative plaster, heat-resistant paint).
Important: in addition to the materials, the corner fireplace stove will be ordered on its own, you need to prepare the following tool: tape measure, construction level, trowel, mortar mixing tank, hammer, grinder, pickaxe, putty knife, plumb line, metal corners, embroidery, shovel and rule .
Foundation for the furnace
Since brick stoves have a large mass, for their correct and safe placement in the house, it is necessary to create a separate foundation. In order to carry out the construction of the foundation yourself, we suggest using the following instructions:
- The foundation should be 80 cm or more wider than the fireplace on all sides. Next, a pit breaks out (0.5-0.7 meters) and simple sand is poured onto the bottom, the layer of which is 9-15 centimeters, after which tamping is performed,
- Next crushed stone is covered with a layer of 9-13 centimeters, the reinforcing mesh is laid,
- Walls are sealed and insulated with asbestos sheets,
- The outer part of the foundation is completed with formwork. For this, one sheet of metal is used, the thickness of which is several millimeters. In this case, bricks act as a support
Important: if the shape of the foundation is rectangular, the metal sheet should be replaced with wooden battens. In the presence of gaps between the racks, they are closed with a plastic film.
- After preparing the solution in a proportion of three to one in the ratio of cement to sand. The solution layer may vary from 10 to 15 centimeters,
- After the solution has dried, a second layer is applied and after partial drying, the foundation must be covered with polyethylene,
- Construction solidification usually takes 10 to 20 days. After that, the surface is additionally covered with several sheets of roofing material or any other insulation.
Material Tips
In order for the subsequently constructed structure to have high strength, safety, and correctly perform its function, we recommend that you do not skip this additional step in the preparation of building materials:
- If the repair and construction of the house is already fully completed, pay special attention to the installation location. When working and building, you should not be hindered by various beams, floors and partitions,
- Before starting installation and assembly, you need to remove all the furniture from the room, as otherwise, a large amount of dust, dirt and construction debris will settle on it,
- The brick is pre-soaked in running water for several days, and the construction of the furnace can only begin after a few weeks after the foundation is built,
- Before using mortar for connecting bricks, we recommend that you dry masonry and dock each row in turn. Brick numbering is allowed.
Arrangement of the corner fireplace: first variation
This oven is small in size and average weight, so it can accommodate in rooms with an area of 30 square meters or more. Scheme, ordering and masonry technology developed by Bykov:
- Buy a grate in advance, 25 by 25 centimeters in size and metal strips (about 5 millimeters thick and 3-5 centimeters wide),
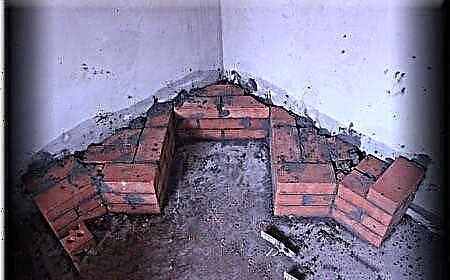
- For the first and second row, you will need 14 bricks, which are laid out in the shape of a triangle (cutting will be required),
- The fourth row is the beginning of the assembly of the combustion chamber. For it exclusively fireclay bricks are used,

- For installation on the 5th row of an ash pan, it will be necessary to lay several metal strips on the side brick walls of the furnace. On the sixth row, the grate is laid out (use fireclay brick),
- The combustion chamber begins to line up and take shape already on the 7th row,
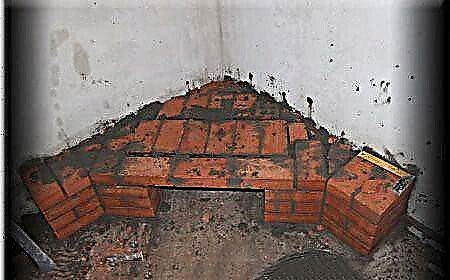
- We continue to build the portal of the furnace from 8 to 12 row,
- When laying out 13 rows, we fix and install metal corners measuring 60 by 5 by 0.5 centimeters,
- On the fourteenth and fifteenth row, we begin to lay out the “mirror”. This element is necessary for the accumulation and retention of generated heat. The resulting wall should be at a slight angle of twenty degrees,
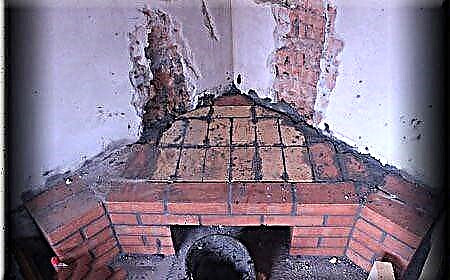
- At 16, we begin to bring out the tooth, and coat its surface with a solution based on clay. So, this protrusion will be smooth and convenient for further use,
- Next, we create a bend that will serve as a frame for the tooth. The brick for masonry should have hewn walls (a row from the seventeenth to the nineteenth),
- On the twentieth row, we begin to lay out the hail, up to the twenty-second. The dimensions of this part of the chimney should be 14 by 27 centimeters. Next, we install the smoke damper,
- Up to the twenty-fifth row we lay out the chimney, so that the size of its inner part is 14x27 cm,
- We install a metal pipe and close its upper part with a metal casing.
Corner Brick Oven: Option Two
This design has the simplest laying principle. The base is distinguished by a square shape, and the bricks themselves are laid on a flat cement surface:
- For the first row, we need 25 bricks, of which the base of the square shape is laid out,

- On the second row we need to lay out the warping of the bottom of the future firewood. For additional fixation, a metal corner measuring 5 by 5 centimeters with a length of 60 is used,
- Next, we lay a sheet of metal (40x60 cm and a thickness of 2-6 millimeters), on the fourth row we completely lay it with a brick,
- To build 5 rows, we need fireclay bricks. Further (on the 6-8th row) the walls are assembled - the base of the combustion chamber (red brick). For cladding the inner surface fireclay brick is used (it is cut longitudinally in two),
- From 7 to 9, the laying of bricks is carried out at a small angle and thereby a tooth is formed,
- At the tenth and eleventh, the rear wall of the structure continues to assemble,
- 12 row is the overlap of the previous one. To do this, we use several metal corners with dimensions of 5x5 and a length of 60 cm,
- Standard masonry is performed in the fourteenth row. On the fifteenth row, the tooth completely overlaps and passes into the chimney,
- On the sixteenth and seventeenth, a fireplace shelf is formed. To do this, the rows need to be slightly shifted outward,
- Up to the twentieth row, a gradual narrowing continues, passing to the chimney,
- On the twenty-fourth row we form the red part of the chimney with red brick and lay its base on 25-29,
- The smoke damper is mounted on the twenty-seventh row.

Layout of the first rows of the corner fireplace
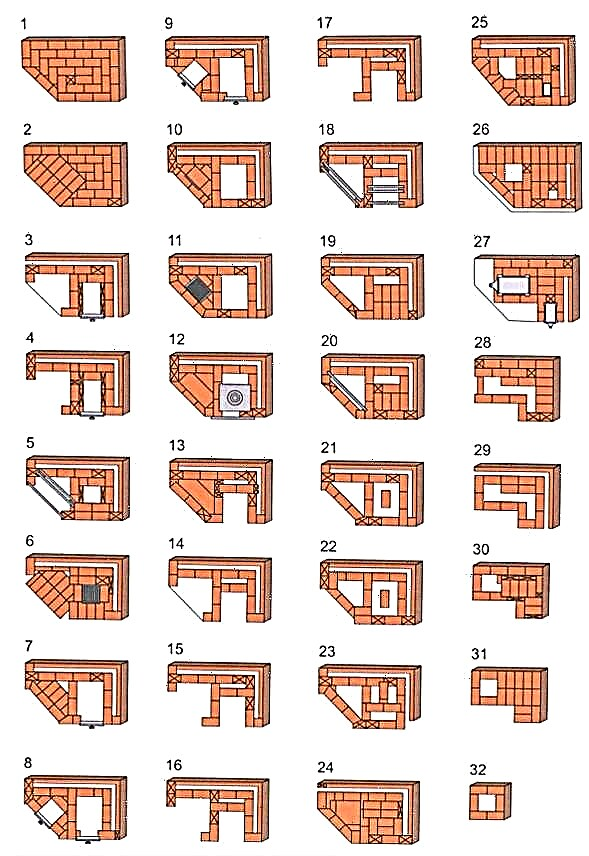
The third ordering scheme consisting of 32 rows
A do-it-yourself fireplace with an angular arrangement, the variations of which are presented in this article, can be assembled with your own hands, even without the proper experience and installation skills. In order for your heating unit to have high functionality and guaranteed to be safe, we advise you not to skip the preparatory stages, as well as take as a basis the tips and recommendations posted above.