In the conditions of modern megacities, when daily difficulties arise with a park car, the issue of building a room for its safe parking is very relevant.
The construction of a garage is a costly and troublesome business. If he is not shell or pencil case.
it light garage for a car that can solve sensitive issues.
Garage Shell: Pros and Cons
Thanks to its compact size and easy installation garage pencil case or shell becomes the only way out of the situation when the problem is solved car safety and the ability to rest peacefully at night without fear that the car will disappear in an unknown direction during this time.
Shell metal garages have their undeniable advantages:
- design reliability (even the most resourceful hijacker will not pick up the car),
- weather protection (vehicles covered with snow or watered with rain during the day - this spectacle “breaks the heart” for a motorist),
- ease of installation (no foundation needed, sheathing is installed on the frame),
- a shell or pencil case can make out and to transport to any other convenient place
- if you own a land plot, for the construction of a garage no permission required administrative authorities
- the possibility of using the premises and for other purposes (tool storage, for example)
- profitability (cash costs are minimal, on average a shell or a pencil case costs 35,000 rubles),
- compact sizes (a garage a shell a pencil-case does not create difficulties for other motorists, even if it is located on the territory of the apartment building).
The disadvantages include:
- gradual damage to metal parts subjected to corrosion,
- high thermal conductivity
- crowded rooms
- modest appearance.
What garage pencil case? This is a neatly built garage with modern materials that looks very good.
Garage shell - Photo:
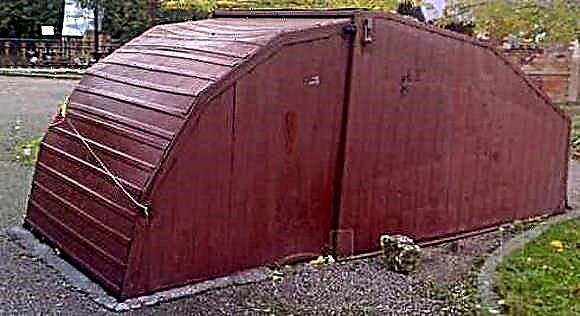


As you see in the photo garage pencil case from shells different shape.
Weight and where can I buy?
How much does it weigh garage pencil case? Looking at it, an outside observer notes that it is more compact and economical not to come up with an option. There is a very small distance between the garage skin and the car, which allows you to only put the tools on the shelves or hang them on nails driven into the walls in advance. That's why shell garage weight small, approximately 900-1100 kg.
Metal garage pencil case can be bought in many cities of Russia in its standard factory options or made independently. In the first case, the problem of the frame, fasteners, casing is solved - they are sold as a set. In the second - the components will have to choose for yourself.
Do you need a foundation?
There are no garages in the installation of the foundation no need. In exceptional cases, reinforcement with a columnar foundation is required. This is a system of supports, dug to a certain depth into the ground and supporting the room on weight.
In the preparatory phase should clear area from rubbish and grass. The base may be a crushed stone-gravel, tightly compacted layer or concrete site.
Basic requirements for the site:
- lack of potholes, holes, bumps, bumps,
- flat surface area greater than the area of the garage.
In urban conditions, find such a site not difficult.
How to do it yourself - highlights
It’s better to do the work with an assistant, but also to cope with it yourself not difficult.
- At the selected site, the necessary markup.
- At the corners are exposed stakes, a rope is pulled between them.
- Preparing a bed of crushed stone and gravel for the site, carefully rammed in the territory.
- Alternatively, you can install the formwork and fill the site concrete mortar.
- If the upper earthen layer consists mainly of clay, you can do without formwork.
- On the base are installed boards 5 cm thick and not less than 200 mm wide.
- The frame of the frame may be wood barshaving a cross section of 5cm * 10 cm or 4cm * 8 cm.
- Fasteners are steel strip eyes or bolts. Closer to the base of the frame are installed hinges.
- Steel and dural pipes protrude as a frame. Their fixation occurs with metal rails during the construction of the garage.
- For assembly of a frame are used wood yardscoupled by brass bolts. Wooden parts are perfectly attached with casein glue.
- To fix the structure and make it more durable, it is passed through corners and the frame reliable cord.
- As a covering can act tarpaulin, corrugated board and other strong materials.
For construction shells or pencil case there are other options. The main thing is to make accurate calculations so that the room doesn’t “slip” on its side, is not built up, and somehow - at random.
In the diagram below, you can see how to make a garage a shell and a pencil case with your own hands: 

Goal
Common door options for this type of garage premises are swing and lifting-sectional. The second option is much more convenient, allowing the car to drive directly to the garage. In operation of such a gate there is nothing complicated. When opened, they rise vertically upwards and then "leave" at a right angle under the ceiling surface.
Swing gates consist of 2 wings and are usually made of the same material as the garage. A significant disadvantage is the inability to open the gate in the winter until the site is cleared of snow drifts in front of them. In addition, when opening the sash is required extra space, which can be closed next to standing cars.
Conclusion
In populated cities, the issue of car parking has not yet been resolved. It’s not always and everywhere that you can find a parking space, especially during peak hours. Multi-storey car parks could reduce the number of perplexed motorists, but these structures are too few for a huge number of cars, the number of which is increasing every day.
What garage shell? These are folding car garages that solve the problem of expensive car parks, vehicle safety and, ultimately, peace of mind for motorists.
Design features
Most car owners have long replaced traditional shell garages with pencil cases. Their design is not a big deal.
The box is made in the form of a frame made of galvanized profile and pipe. Assembly is carried out by welding and bolts, all seams are covered with a special tool that protects against the formation of corrosion. After which the surface is painted with pentaphthalic enamels.
The walls and roof of the structure are covered with corrugated board. To cover the roof, corrugated board with a height of up to 50 mm is used. The roof is laid horizontally on the ceiling beams without an intermediate grille.


The gates can be swing or lifting, in this case the choice depends only on the wishes of the customer. Lifting gates are characterized by durability and ease of use, so they are often chosen.
The dimensions of the garage canister can be varied and designed for bikes or motorcycles with an area of 7 m2 to 9 m2, or designed for large cars with an area of 4x6 m or more.

Standard sizes
The dimensions of the garage-case directly depend on the dimensions of the car. You must also understand in advance whether you need free space for installing racks. According to the standard, steel structures must have a release within 1 meter on each side.
To date, there are 2 types of garage garages:
- product for one vehicle with dimensions 3x6x2.5 m,
- a wide model designed not only for car storage, but also for a small workshop with dimensions of 3x9x3 meters.
The choice of design directly depends on the requirements and wishes of the customer.


Despite the fact that outwardly the garage-pencil case seems massive and heavy, in fact, its weight with a roof without a foundation varies within two tons. Due to the fact that the design parameters are small and compact, this is the model that most car owners choose. Now there is no need to install powerful structures with a foundation.
Please note that the weight of a building depends not only on its dimensions and shape, but also on the thickness of the metal. If corrugated board with a thickness of 2 mm is used, the mass of the garage will be approximately 1 ton. If the sheet thickness is within 6 mm, the garage will weigh more than 2 tons. Keep this in mind when choosing a weight manipulator.


Seat selection
Before you start building a garage, you need to not only purchase profiled sheets, but also choose a place where the future construction will be located. The garage is not recommended to be erected next to other household facilities, as this may impede the car’s exit and entry. Often, a garage is built in such a way that its gate line is located on the fence line. Thanks to this, access to the structure will be simple, and it will additionally fulfill the role of part of the fence.
In addition, the garage can be installed right next to one of the buildings located on the land. In this case, you do not have to build one of the walls. But it is worth noting that it is impossible to attach the structure to the house, since not only the unpleasant smell of gasoline, automobile oils, but the sound of the engine will penetrate the premises.
Garage pencil case assembly
Let's look at the steps that a typical instruction for assembling a pencil case garage includes.
First you need to weld the frame of the back wall. With standard dimensions of 2 by 3 meters, you will need to purchase 2 profiles 50 x 50 mm, one diameter - 2.9 m, polystyrene, profiled sheet, and a welding machine from the equipment
When connecting elements, pay special attention to observing right angles, for verification of which you will need to acquire a building level. After the frame takes its shape, it will need to be strengthened by a crossbar to give structural rigidity
The side walls are assembled in two parts. For the first part, horizontal rails are taken 3 meters each, but the vertical racks are different: 200 and 210 mm. The second part will not differ in horizontal crossbars, but vertical ones will be 210-230 mm long. After fastening the two components of the side wall, a spacer is installed, measuring 2.9 meters. The extreme rack will serve, among other things, as a support for installing the gate.
All sections are interconnected by bolts. To do this, you must first drill holes in adjacent halves at the same level. The rear wall with the side is fixed according to the same principle.
When the side and back walls are assembled, you can sheathe this entire structure with corrugated board.
One of the most important garage designs is its gate. The size of the door frame directly depends on the dimensions of the entire garage as a whole.
The most common gate pattern is the option to open the doors to the sides. To assemble this design, we will use sheets of corrugated board, metal battens. The dimensions of the components are selected according to the overall dimensions of the “box” of the garage.
Gate leaf assembly takes place in several stages. First, its frame is created from two long and two short rungs that are welded together. Then a stiffening beam is mounted, approximately 1 meter from the top edge. The second leaf is assembled in a similar manner. At the final stage, the entire structure is sheathed with corrugated board.
The next step for free opening and closing is to install the hinges on the upper and lower edges of the gate leaf. The reciprocal hinges must also be welded onto the gate frame.
In any case, after installing all the hinges in their place, be sure to oil all the rubbing elements with oil. In addition, at this stage it will be necessary to weld the lock loop on one of the wings.
In the process of assembling the garage, try to follow certain rules:
- the area for the installation of a garage-pencil case should be cleared,
- reinforce the back frame with jibs,
- fixing bolts for connecting the side and rear walls are drilled at a distance of 20 cm from the upper and lower edges,
- apply the fixation using hardware
- lower cross logs are mounted at a distance of 2 meters,
- metal spacers are installed,
- the installation of corrugated board is carried out with an overlap, in one direction, and a fixing element is also used each deflection
- the final stage will be covering the roof with a protrusion of it beyond the cornice level by about half a meter.
After arranging the exterior of the garage, you can begin to install the internal environment. The main elements of the “furniture” will be various lockers for tools and spare parts.
Location selection
Before building, you need to determine the ideal place for the construction of shells. Under the garage you need to choose a flat surface, ideally - filled with concrete.
It is also worth deciding in which direction the sash should open. Most often, they try to put shells in such a way that the driveway is short and convenient. For this reason, they are located closer to the gate.
Tool search
The next step is the selection of the right tools. The task is not difficult, but those who have never done anything like this will still need to tinker with the process of work, and with the choice of materials and improvised tools.
The basis of the garage is made of metal. Therefore, you need large sheets and a welding machine to connect them. They are cut using a grinder and a set of discs. It is also necessary to ensure that different measuring instruments are at hand. Their list is quite short: vernier caliper, tape measure, hardware.
Blank making
When all the components are selected, you can start building shelters for the car. As a rule, it takes about five to seven days to build a shell. Especially if a person has never done anything like this.
The first stage of construction is the procurement of nodes. Individual sections can be of different sizes. Parameters are selected for the car. For a large car you need a large shelter.
For a fixed section, you will need not only a wide metal sheet, but also two racks cut from a steel corner. They are placed around the edges, and at the top they are connected using a special metal cross member, which should be the width of a future garage. All these parts are welded together, resulting in a design that is vaguely reminiscent of a football goal. In the same way as this gate, the future support needs additional support from wood.
A metal arch can also be made by hand. It is impossible to bend a steel corner without using additional tools, so welding will be needed, with which the base can be divided into parts with a width of about thirty centimeters.
The second part of the shelter is done on the same principle, however, it needs to be expanded a little
The increase in this part is important, because without it it will not be able to open completely
Search for an alternative
Durable metal shells have many advantages. But due to the large weight, problems with movement and other nuances, many are still looking for other, more convenient options.One of these can be called a garage of the same type, but made of tented fabric.
The design of the desired height will also become reliable protection against rain and the scorching sun. Like simple high-quality awnings, it does not pass either wind or water. To protect the car, you can use either tarpaulin or polyester fabric soaked in various protective compounds. This shell option is perfect for temporary housing, for example, for a summer house or a suburban area where the family does not live for so long.
How to assemble?
Any garage construction of this type is built in several stages.
Location selection
Before building, you need to determine the ideal place for the construction of shells. Under the garage you need to choose a flat surface, ideally - filled with concrete.
It is also worth deciding in which direction the sash should open. Most often, they try to put shells in such a way that the driveway is short and convenient. For this reason, they are located closer to the gate.
Tool search
The next step is the selection of the right tools. The task is not difficult, but those who have never done anything like this will still need to tinker with the process of work, and with the choice of materials and improvised tools.
The basis of the garage is made of metal. Therefore, you need large sheets and a welding machine to connect them. They are cut using a grinder and a set of discs. It is also necessary to ensure that different measuring instruments are at hand. Their list is quite short: vernier caliper, tape measure, hardware.
Blank making
When all the components are selected, you can start building shelters for the car. As a rule, it takes about five to seven days to build a shell. Especially if a person has never done anything like this.
The first stage of construction is the procurement of nodes. Individual sections can be of different sizes. Parameters are selected for the car. For a large car you need a large shelter.
For a fixed section, you will need not only a wide metal sheet, but also two racks cut from a steel corner. They are placed around the edges, and at the top they are connected using a special metal cross member, which should be the width of a future garage. All these parts are welded together, resulting in a design that is vaguely reminiscent of a football goal. In the same way as this gate, the future support needs additional support from wood.
A metal arch can also be made by hand. It is impossible to bend a steel corner without using additional tools, so welding will be needed, with which the base can be divided into parts with a width of about thirty centimeters.
The second part of the shelter is done on the same principle, however, it needs to be expanded a little
The increase in this part is important, because without it it will not be able to open completely
Assembly
After all the blanks are made, you can proceed to the assembly phase. It is at this moment that the two parts of the shell join. Both workpieces must be put on a flat surface and determine where the hinge will be fixed. Instead, you can also use simple garage hinges.
The fixed part of the workpiece is fixed at this stage. This can be done with anchor bolts. Then the second part is attached. When the frame is ready, you can sheathe both sections with metal strips. They also need to be prepared in advance, having calculated what height and width are needed.
At the junction of two separate sections, you must definitely weld the hinges for the lock or install another protective structure. After completing the preliminary work, you can proceed to work with surfaces. First of all, you need an anti-corrosion agent that will protect the shell from external damage. The next layer is the paint. As a rule, choose gray color, because it is the most versatile and least easily soiled.
In some cases, motorists, on the contrary, try to highlight the garage, making it more vivid. To do this, it is not necessary to completely paint the entire metal base. Sometimes it’s enough just to apply a few bright stripes at the junction. Such pencil cases look more interesting, and their painting will not greatly increase spending.
Search for an alternative
Durable metal shells have many advantages. But due to the large weight, problems with movement and other nuances, many are still looking for other, more convenient options. One of these can be called a garage of the same type, but made of tented fabric.
The design of the desired height will also become reliable protection against rain and the scorching sun. Like simple high-quality awnings, it does not pass either wind or water. To protect the car, you can use either tarpaulin or polyester fabric soaked in various protective compounds. This shell option is perfect for temporary housing, for example, for a summer house or a suburban area where the family does not live for so long.
How to assemble?
To assemble it with your own hands, you need to make a project plan in advance and buy materials.
What is a garage pencil case
A pencil case, the basis of which is a carrying sheet made of galvanized steel, is by law not equated to a building, but to an automobile awning, and its construction costs several times cheaper than a garage.
Decking is a profiled sheet of cold rolled steel with a protective anti-corrosion coating in the form of coatings or zinc oxide. Depending on the type, the material can have a thickness of 0.7 to 1.5 mm, and its reliability indicators significantly exceed the capabilities of smooth-sheet material. It is wave rolling that makes the structure more rigid and stable.
The name of the garage-pencil case is directly related to the ease, convenience and compactness of the design, which can be installed anywhere without violating the law. The building, when calculating the dimensions of which takes into account all the wishes of the motorist, will not take up much space, and will easily fit into the space allotted for it.

In addition to low weight, a penny garage is good in that it can be easily disassembled and moved to another place if necessary. The terms for building a garage are extremely minimal - it will take no more than 2 hours.
Design features of a standard pencil case
Profile "house" for a standard machine has the following dimensions:
- Height - 2.5 m
- Length - 6 m
- Width - 3 m.
The size of the garage may vary depending on the characteristics of its "occupant".

To ensure that the structure lasts as long as possible, the design provides for a roof slope, which is best done on one side using racks of different sizes. The cost of a structure with a weight of about a ton does not exceed 20,000 - 30,000 rubles.
Many people confuse a garage-pencil case with a building called a “shell”, the construction principle of which is about the same, but the structure has a different shape and completely different design features.
Distinctive features of the penny garage are the lack of need for a foundation and sufficient strength.
Advantages and disadvantages
The obvious advantages of structures of this type include:
- Low cost
- The ability to choose the colors of the structure,
- No need to buy land,
- Lightness and mobility
- Strength and durability
- Light weight and modest dimensions,
- Speed of construction,
- No need to build a foundation
- Lack of condensation (and due to rust on the car),
- No paperwork required
- Ease of use and ease of maintenance
- Durability.
There is also the versatility of the areas of use of this building. In addition to the premises for sheltering a car, such a garage can serve as a car workshop, a place to store tools and equipment, as well as unnecessary things.

The disadvantage of the garage-pencil case is the material of manufacture itself, namely, its property is very hot in the summer. You can avoid such a “steam room” by installing a structure under the trees or in the shade of houses. In addition, the overall dimensions of such a garage are not too large, which may cause some inconvenience.
We draw up a project and estimate
In order to avoid unnecessary costs and a large amount of remaining material before construction, it is important to consider every detail of the structure. All the nuances should be transferred to the compiled drawing. You can create it yourself with the help of improvised tools in the form of a ruler, compass and pencil, or use a computer program.
Do not forget to foresee the installation of compact racks or cabinets for equipment, tools and spare parts in a future room.

For example, we will take the familiar design with the above standard dimensions:
- Decking is taken with the calculation of the total area of the walls, gates and the roof of the pencil case, which does not exceed 65 m 2. Given the average cost of the material, a profiled sheet will cost you about 10.5 thousand rubles.
- Sheets of metal are needed for 14 plates. The cost of 1.5 m of steel will come out no more than 100 rubles.
- Profile for racks and crossbars. Taking into account the dimensions of the average garage case, you will need 110 m square profile (50x50 mm), the cost of 1 running meter of which is about 50 rubles. As a result, 5.5 thousand rubles will be required for load-bearing structural elements.
- Corners for fixing the profiled sheet (10 m). An external corner costs no more than 100 p. for 1 running meter, in the end it will take about 1 thousand rubles.
- Hinges for installing doors. Depending on the design of the "portal", this element may differ. For standard swing gates, you need 2 sets of hinges, which in total will cost about 150 p.
- Fasteners (bolts and screws) are best taken not strictly according to the calculated amount, but with a slight excess. A total of about 1 thousand rubles will be needed for fasteners.
A detailed project will help to accurately calculate the required number of building materials and objectively assess the cost of the structure.
If the standard garage sizes are not suitable for your car, make all calculations based on your needs.
Calculation of the future design
Taking into account the exact dimensions, put on the drawing all the necessary elements of the future structure.

It is important to correctly calculate the gate opening mechanism, so that manipulations can be made with a slight movement of the hand. To do this, you need to accurately calculate the place where the sash will be attached, and the trajectory of its opening.
When the drawing, taking into account all the nuances, is ready, you can begin to prepare the tool and purchase materials.
Materials and Tools
The preparation stage is of great importance. It is important to buy everything you need in advance so that during construction you don’t have to get distracted by buying bolts or finding a screwdriver.
In the off-season, the price of building materials will be slightly lower.
Tools for building a garage:
- Welding machine with electrodes,
- Bulgarian,
- Electric drill with drills,
- Cue-screwdriver
- Plumb and level
- Marker or construction pencil, square, tape measure.

- Square steel profile,
- Sheet metal,
- Decking
- Crushed stone and sand (if necessary),
- Fasteners (canopies, nuts, pegs, screws and bolts).
Preparatory work
Although the installation of a garage-pencil case does not take much time, the preparatory stage is important, as in any process.
Need to find and prepare a place for the garage:
- Remove rubbish from the site,
- Level the soil (remove mounds and fill up the holes),
- Pour and compact the crushed stone layer,
- Cover the site with sand
- Equip a convenient descent for the car.
When the site is ready, you can proceed with the assembly of the garage.
Action algorithm
- Assembly of the frame. According to the prepared drawing, the profile is cut into segments of the desired length. For ease of installation, elements can be signed.
- Further, pegs are hammered into the ground around the perimeter of a future building, the lower contour is laid out from the profile, it is mounted on bolts and tacked by welding. After checking the coincidence of all diagonals, the perimeter is thoroughly welded.
- Vertical racks are attached. The position of each element is checked by level.
- The connection of the racks in the middle of the horizontal sections of the profile.
- Assembly of the upper contour of the structure. First, the side jumpers are attached, then the back and front walls. After the alignment of the upper tier, overhaul of the elements is performed.
- Mounting profiled sheet. The material is attached to the frame using self-tapping screws. At the end of the work, you can cut or weld the sticking ends of the fasteners, but in this case the garage can not be dismantled without loss.
- Hinged gate. It is more convenient to use a lifting structure. Such gates are more compact and evenly distribute the load on the front pencil case machine.

Arrangement and finishing work

The simplest and most inexpensive solution for finishing a garage-pencil case is painting the frame. If desired, you can sheathe the walls with moisture-resistant drywall, followed by plastering and painting the walls. It is better to fix the insulation on the ceiling with the example of polypropylene and sew up with plastic. You can completely insulate the ceiling and walls and sew up the rough finish with lining.
The garage pencil case is a convenient, ergonomic and economical solution for many car owners. Its cost is low, the construction is simple, and paperwork and running around at different instances are not required at all. If you doubt your own abilities, you can invite familiar experts to help, and then the process will be more fun.
Design features of the garage pencil case

As already mentioned, the rectangular frame of the box is a construction of steel pipes and galvanized profiles. The connection of all elements of the frame occurs by welding. In addition, it is customary to fasten the roof structure to bolted joints. In order that corrosion does not go along the welding and cutting lines, each seam must be carefully treated with a special anti-corrosion compound. To make the coating more durable, the exterior facade of the garage canister is treated with pentaphthalic enamel.
Along the perimeter, the walls and the roof of the metal garage of the pencil case are covered with a set of sheets of corrugated board. When buying corrugated roofing for a garage, be sure to choose a modification with a profile height of at least 50 mm. The installation of the roof of the garage canister occurs directly on the metal beams located horizontally. The garage case does not require the arrangement of intermediate ceilings and crates.
When assembling a garage, it is necessary to leave space for swinging or lifting gates. It all depends on your imagination - the manufacturer can produce any option for your sketch.
How much does a garage pencil case weigh?
Despite the fact that metal structures may seem heavy, the total weight with a roof without a foundation will be in the region of 1-2 tons. Due to the fact that the dimensions of the garage of the pencil case are quite compact, there is no need to make large garages with a monolithic foundation.
It is important! The weight of the pencil case garage depends not only on the size and shape of the frame, but also on the thickness of the metal. With 2 mm decking - the weight will be in the region of 1 ton. If you decide to transport a garage pencil case with a wall thickness of 4-6 mm, it is necessary to provide a manipulator for cargo in the region of 2 tons.
Standard types and sizes of pencil case garages
As a rule, the size of the pencil box garage is determined by the dimensions of the vehicle. In addition, at the stage of creating the project, you must decide whether there is a need to equip additional racks, shelves and a place to store tools and things. According to the standard, steel garages cans should have an additional output in the region of 0.5-1 meter on each side. Now we can distinguish 2 types of pencil case garages:
- Standard boxing for 1 car with the following parameters - 3x6x2.5 meters,
- Expanded modification of the garage, combined with the workshop, with a total size of 3x9x3 meters.
In the photo of the garages of pencil cases you can see several options for their designs.

Key Benefits of Garage Pencil Case
- Not required to place a lot of space on the site,
- The simplicity of assembly makes it possible to build a garage for a pencil case with your own hands,
- No solid foundation needed
- Durability and high reliability of the metal frame,
- The ability to save money on creating a place to store a car.
I would also like to note the fact that the garage case does not require documentation on registration and legalization of the structure. You can disassemble the box at any time and assemble it elsewhere. In the video, the garage pencil case is presented in various versions, and also considers the features of its assembly with your own hands.
When is it necessary?
A garage pencil case is a great option for those who want to save financial resources. Its cost is significantly lower than the price of capital buildings. Such a garage fits perfectly into any exterior, without violating the overall architectural plan.
The cost of the garage does not depend on its color, so the buyer can choose absolutely any shade.


Also, a garage pencil case is a good choice to save space. You can choose designs only for car storage, and you can choose a garage, taking into account the fact that other accessories will be stored in it. Before buying, decide if you need a place to store spare parts and tools, means for car care, as well as how much space you need to service the machine. Given all these nuances, you can choose a design that will meet all your requirements and wishes.


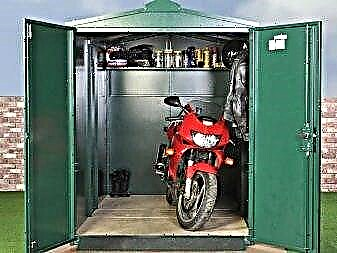
Car storage
The demand for such a design has long proved that a garage-pencil case is the best place to store vehicles. With proper assembly and installation, the car receives protection from winds and various rainfall. According to manufacturers, the roof is designed for a maximum load of up to 100 kg per m2. As a rule, there is no insulation inside, there is no condensation and water vapor in the room, which makes storage even better. In summer, due to the heating roof, the ventilation of the structure only improves. The low weight allows you to install a garage without a foundation, so it is considered a temporary building.


The only drawback of this design is the poor resistance to cracking, so the owner must take care of the additional protection of the structure.

Design calculation
The total price will depend on the accessories. We need the following elements for a 3 by 6 garage, 2.5 high:
- Metal profile. About 60 sheets. The price per square meter is about 170 rubles. As a result, about 10 thousand.
- We need screws for fastening. The price for one is 2 rubles. It takes about 370 pieces. Therefore, the price is 740 rubles.
- External corners for corrugated board are needed. The size of one corner is 1 meter (it costs about 1000 rubles).
- We also need profiles in the form of a square 5 by 5 centimeters. One costs about 50 rubles. We need 110 meters, so the price is about 6000 thousand rubles.
- Hinges. From 100 rubles.
- Bolts (7 and 12 centimeters long), 10 pieces each. The total price is about 500 rubles.
- Metal plates. They will be needed in the welding process. Price - 100 rubles for every 1.5 meters.
The total price will be about 20 thousand rubles.
Necessary materials and tools
To collect the following tools are needed:
- Electrodes and apparatus for welding.
- Grinder and circles for metal.
- Screwdriver.
- Sanded and cutting discs (for grinders).
- Drill and drill set.
- Roulette, marker and square.
We also need to buy materials in advance:
- Square metal profile.
- Profile sheets for plating, zinc plated. For walls, marking C20 is suitable. For the ceiling you need higher.
- Metal strip 5 millimeters.
- Bolts and nuts of various sizes.
- Hinges for gates that can be welded. Diameter is about 16.
- Liquid Nails.
- Expanded polystyrene, PVC pipes or foil wool.
- Screws and screws.
Step-by-step garage assembly
- It is necessary to assemble the frame. To begin with, we mount the back wall. It is made from profile.
- In the middle of the wall frame we mount a transverse strip. It acts as a stiffener.
- Weld the frame.
- Now we need to assemble the side walls. To do this, you need a metal profile.
- We make the roof. Set the ramp to the back wall.
Installation of the finished structure
Installation is as follows:
- First you need to set the back wall.
- Install the sidewalls. We connect their frames.
- After 3 walls will stand, weld the hinges and install the gate leaves.
- Now you need to sheathe the structure. Metal sheets work well.
- In the corners outside the garage you need to put protective fittings.
- Install the roof. We mount the roof, starting from the back of the garage. Be sure to make a slope to the rear wall so that water does not accumulate on the roof.
Assembling a garage shell is not difficult. You may need a couple of people to help. But the result is an ideal place to store a car.
Drawing Rules and Materials
Before starting work, it is necessary to draw up a high-quality design of the building. It reflects not only the components of the future building, but also the ways of attaching the frame to the foundation, other significant details
It is important to note all the joints, accurately calculate the stiffeners. After drawing up a detailed plan, you can figure out how much material you need to purchase, what will be needed for the construction.
Pipes will also be connected to each other. In the drawing, you must specify the connection method. The best option is welding, but if you plan to disassemble the garage, you can use other types of connections. As an option - the use of corners that connect together several parts.
It is best to use square professional pipes for building a garage. You can use rectangular products, but collecting them will be somewhat more difficult due to the irregular shape. Typically, 100 mm walls are used for erection. Such parts can give the strength of the structure, its independence from external weather conditions. Stiffeners are used with walls of 60 mm. According to the drawing, it should be calculated how many pipes will need to be purchased.
Garage project 6 by 6 meters
So, we decided on the size, then you need to develop a garage project of 6 by 6. And you should start with the choice of material. I do not advise you to build it from brick. Expensive, you need a powerful strip foundation, the walls will be cold, you will have to insulate.
Foam blocks - a more rational solution. Of course, a 6 by 6 garage of foam blocks is also an expensive construction, but there will already be at least minimal thermal insulation. I won’t write about how many foam blocks are needed for a 6 by 6 garage. It’s not hard for me to calculate, but again, the 6 by 6 garage project is a loose concept. Someone has a little more, someone has a little less, someone will make a three-meter ceiling, and someone will make it lower, if only the car could drive in.
Garage 6 by 6 meters makes it easy to arrange 2 cars.
A 6 by 6 wooden garage is attractive in terms of price, especially if you choose a frame option. In this case, you can limit yourself to an inexpensive pile foundation. But you need to be prepared for the fact that such a garage requires constant care. Every year, something will have to be corrected, tinted. Wood is a beautiful, environmentally friendly material, but sensitive to many environmental factors, including:
- Ultraviolet radiation,
- Dampness,
- Microorganisms
- Insects
- Rodents.
You can use special impregnation, they slow down the process of destruction of the tree. But protective coatings need to be updated periodically. You can, of course, use wood species resistant to external influences, for example, larch. But then the garage will be far from budgetary, especially if it is not about the frame, but about a garage made of timber.
A 6 by 6 meter frame garage at first glance has a rather complicated structure, but it is being built very quickly.
But there is a great alternative to wood - metal. You can build a wireframe lined with sandwich panels. Price - at least one and a half times cheaper than brick. The sandwich skeleton will turn out to be warm, belt-like, not requiring special care. The steel frame is almost eternal. Panels can be replaced. And there is another interesting nuance.
Build on your own or buy?
Having decided on the installation of a garage-pencil case, many car owners are faced with the question of how to do this. In free sale you can find and purchase all consumables and basic materials, fasteners, tools, drawings. And do it yourself and assemble it yourself in a pre-selected territory. One of the significant difficulties in this option will be the choice and arrangement of a door opening mechanism. Swing gates are cheaper and easier to maintain. Modification of automatic opening operation is more expensive and requires careful observation during operation.
Tip: the roof device must be done with a slight slope in a convenient direction - for the snow to melt. Otherwise, you will have to regularly clean the roof to avoid deformation or possible leakage.
A lot of ads in newspapers “buy a garage” and a constant increase in the number of cars in megacities allow us to use the idea of assembling constructions of a penal type for organizing a business. This is quite beneficial, since it refers to a narrow specialization and does not require significant initial investments of financial and labor resources.
Sizes of shell garages and construction technology
How to install a garage pencil case (shell) - step by step instructions:
- First of all, the supports are installed. There should be six pieces: four - at the corners of the structure and two in the middle for balance and stability of the structure. The supports will help the shell to be stronger, more reliable and to avoid deformation. If you are thinking of moving the garage over time, then you should not fix the supports, if the garage is planned to stay in place for years, then it is better to drive special fasteners, pins into the supports and concrete them.
- The next step is laying out the foundation. To do this, we take two boards with a width of about 20 cm and a thickness of at least 5 cm. To give the garage weight and strength, it is possible to mount “scarves” of tin in the corners (it can be made of plywood).
- We hinge the frames to the base and let the cord pass through the corners.
- When the design is ready, it is time to proceed with the casing. It is made of durable, waterproof fabric. Suitable fabric for the manufacture of camping tents.
- The last stage of work is the installation of side and rear walls, the fasteners of the gates and the installation of the roof, after which you can already equip the finished garage by laying the floor in it and bringing comfort to your liking. If desired, you can also make the second floor of the structure.
Shell garage dimensions:
Assembly of the garage pencil case:
We assemble the standard design of the pencil case with a height of 2.5 m, an area of 3x6 m. The slope of the roof, based on the difference in the size of the racks, goes to the back of the structure.
Before starting construction, mentally divide the future garage into seven elements. These are: side walls, each of which consists of two parts, the back wall, which is an integral element, the gate, represented by two wings.
The back wall is as follows:
- Two pieces of metal profiles of appropriate sizes and a cross-member, 2.9 m long are prepared. The cross-member will make the garage strong and will become the fastening point of the foam with a profiled sheet.
- Now we cook the workpiece. Be sure to check the level with right angles so that there are no distortions, it will be difficult to correct the error afterwards, so it is better to be extremely careful and careful right away.
- Retreating from the top point of 1.1 m, in the middle we mount the crossbar, the support of the whole structure. The side walls, as already noted above, consist of two parts.
- The assembly of the first element consists in the installation of the lower, upper rungs, vertical racks. We weld a vertical stand to the back wall. Also, do not forget to mount the rack to the adjacent part for stability. The key to the strength and reliability of the shell garage is the correctly installed racks. Lack of one element will lead to a skew of the entire structure.
- After mounting all parts of the side wall, we weld another spacer, 2.9 m long. Without it, the garage will be shaky.
- Next, we assemble the side wall frame from the upper, lower rungs, vertical and extreme strut, to which we weld the gate a little later.
After the walls are erected in accordance with all the rules, it's time to take up the strengthening of the floor.
The upper part of the structure is strengthened at four points, the floor - only at three.
Pre-cutting of profiled sheet with a size of 50x100 mm
and here it is very important that the sheet thickness is at least 5 mm
There should be 14 blanks in total, and ten of them make holes for fasteners. These blanks must then be welded along the central axis to the crossbars.
The frame of the gate is also cooked from a sheet of 50x50 mm. But for the manufacture of gates, two vertical racks, 2.6 m long and three cuts 1.4 m long, are already needed: one horizontal, lower and upper racks. All elements are cooked to the central part of the frame.
Read how to build a garage out of sandwich panels.
And also an article here about what a garage tent is and where it can be used.
Schemes and drawings
Any construction begins with the creation of a plan, there is no exception to this and the installation of a garage from professional sheets. Before starting installation work, it is necessary to make an accurate calculation of dimensions and draw a diagram by which it will be possible to easily determine the required amount of material. The dimensions of the garage depend on the dimensions of the vehicle and on what is planned to be additionally stored in the building. If the structure will be intended only for the car, then it is enough to equip a place for it to park and place several racks. As a rule, the simplest project with a garage size of 4x6 meters is suitable for this.
To make the structure not only convenient, but also harmoniously fit into the landscape design of the site, it is important to think through each square meter during its design. Therefore, first draw a layout of the entire structure, and then perform the internal layout
When the width and length of the garage are known, the consumption of building material can be easily calculated.
When creating a drawing, you should pay attention to the fact that the supporting pipes are solid and long
In addition, in terms of the garage, it is worth considering a method of connecting pipes. In the event that the metal structure is built for continuous operation, and it will not be transferred to another place, it is advisable to use welding for fastening. As for the collapsible garage, it will require special fasteners in the form of nuts, bolts and corners. The garage layout should also include door drawings.
Installing a garage from profiled sheets is a simple process, but in order for it to pass quickly and give a good result, you need to purchase high-quality material and prepare the appropriate tools. For installation work on hand you need to have:
- building tape or ruler,
- drill and drill bits for metal work,
- grinder
- spanners,
- color marker for drawing markings.
As for the material, for the installation of the garage you will need pipes made of galvanized metal and profile. Since square and rectangular sections are sold on the construction market, it is best to give preference to the first. They are easy to install and assemble quickly.The frame of the garage must be iron, therefore, in order to provide it with good strength, it is recommended to make the main pillars of pipes with a diameter of at least 100 mm. A material with a section of 60 mm can be laid under the frame of the structure.
Does a metal structure need a foundation?
Since such a garage is inherently collapsible, there is no need to fill the foundation. It will be enough to level the place of future parking before assembly.
Important! The area of the prepared surface should exceed the area of the structure. This is done for reliable fastening. There are no specific requirements for the surface, it can be a concreted area, a tightly-compacted embankment of crushed stone
In both cases, it is appropriate to use piles of rods that drive into the ground or concrete for further fixing the base of the garage
There are no specific requirements for the surface, it can be a concreted area, a tightly-compacted embankment of crushed stone. In both cases, it is appropriate to use piles of rods that drive into the ground or concrete for further fixing the base of the garage.
Instructions for the construction of a garage-shell
Garage-shell consists of 7 parts
A garage shell is often made in the form of a pencil case - such a design is more familiar and convenient. The slope of the roof is created using the difference in the height of the uprights. The slope can be done in any direction of the building.
To make a shell “pencil case”, you need to divide it into 7 parts: the back wall, two side, each of which consists of two sections, and the gate of two wings.
Back wall
This part of the structure, with standard sizes of the garage, has dimensions of 2.2x3 m. It will be required to prepare 2 sections of a profile with a cross section of 50x50 mm for these sizes. You will also need 1 cross-member 2.9 m long, which is welded for additional rigidity and will be used for fixing foam and profiled sheet. The internal dimensions of this part are 2.2 x 2.9 m. All parts must be welded on a flat surface, constantly checking the angles (should be equal to 90 degrees) and the level of the product. The crossbar is installed, retreating from the top of the frame 1.1 m.
Side walls
The side walls of the garage are assembled
The side walls of the garage are made of 2 parts. For the first section, a 50x50 mm profile is required:
- Lower bar l = 3.0 meters,
- Upper crossbar l = 3.01 meters,
- The vertical stand, when assembling the garage, it is connected to the back wall by welding h = 2.2 meters,
- The rack, which is boiled to the second section h = 2.3 meters.
When you weld the entire profile, in the middle you will need to weld a spacer to increase the rigidity of the side wall l = 2.9 meters.
The second part of the side walls is also assembled from profile sections with dimensions:
- The vertical part, which is welded to the first section l = 2.3 meters,
- The last stand, the gate leaves l = 2.5 meters will be attached to it further
- Lower bar l = 3.0 meters,
- The upper crossbar l = 3.1 meters.
When the frame is assembled, a 2.9 m long crossbeam is welded into it. It is fixed at points calculated by dividing the length of the racks in half. These 2 sections will be connected using bolts - you must immediately prepare holes for them. The second wall of the garage is also prepared.
Additional mounts
To strengthen the shell of the garage shell, you need to install reinforcing bars at the top and bottom. The surface of the floor is fixed at 3 points, and the top at 4 places. They are prepared in advance, the details are cut out of sheet metal 5 mm thick, the width of the plates is 50x100 mm. It is necessary to make 14 such blanks, of which 10 are drilled in 2 holes, retreating 1-1.5 cm from the edge. These parts are welded in the center of the crossbars so that the drilled holes are on 2 sides of the crossbar.
4 more plates are done a little differently - they retreat 1.5 cm from the edge of the plate and make a hole, after that another 1.5 cm deviate from the prepared hole and drill another one. These plates are already welded on the edge of the cross member, thus forming products in the form of the letter “G”. The holes will be on one side.
Before manufacturing the gates, the roof of the garage is created. Work must be carried out from below the roof. The profiled sheet must be laid so that it protrudes beyond the edge of the cornice by at least 40 mm, forming an overhang.