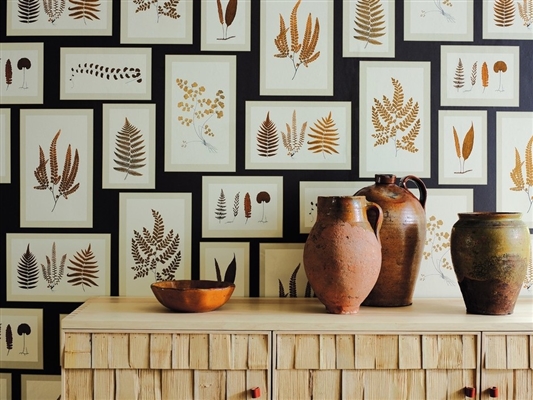
With the help of mosaics, you can make the interior of the kitchen or bathroom attractive and original. There are many types of this material in the modern market. And most of them, like tiles, are glued to the walls with a mortar. However, recently manufacturers have begun to produce a new type of material of this type. Such a mosaic is called self-adhesive, and in addition to its attractive appearance, it is also distinguished by its extreme ease of installation.
What are they made of?
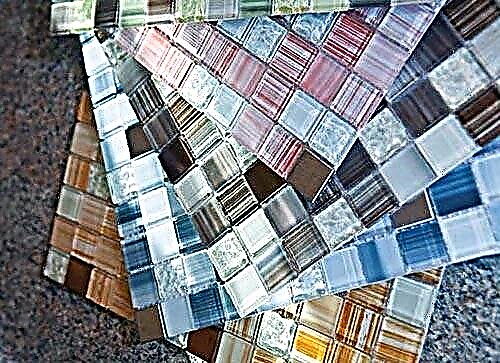
Like any other, self-adhesive mosaic can be made of different materials. Such decoration differs from the traditional one only in that the mini-tiles in this case, even at the production stage, are fixed on an adhesive substrate. The latter is made using rubber and bitumen.
Like a regular mosaic, self-adhesive is usually assembled into assembly squares measuring 30x30 cm. A white waterproof film is glued on the back of each such flexible plate. The use of this material prevents drying of the rubber-bitumen adhesive substrate.
Specifications
The thickness of the decorative layer in the sheets of such a mosaic usually does not exceed 5 mm. The standard sizes of each mini-tile for this type of finish can be 25x25 mm or 10x10 mm. On sale today there is a self-adhesive mosaic:
- glass
- ceramic
- smalt,
- stone
- composite
- metal.
The colors and textures of this modern material can be very different. If you wish, you can purchase a monophonic self-adhesive mosaic or assembled from tiles of different colors for finishing the kitchen or for the bathroom.
What surfaces can be glued
The ease of installation of the mosaic of this variety lies, among other things, in that it adheres to the surfaces very firmly and at the same time quickly. That is, the master does not have to hold the sheet of such material for a long time when finishing on the wall with his hands.
Gluing a mosaic of this type is allowed on absolutely any surface. Most often, such sheets are fixed, of course, on the plastered walls. But if you want with a self-adhesive mosaic, you can finish wooden surfaces, concrete or metal. In kitchens or bathrooms, such material is also often mounted simply on top of an old tile.
Since the rubber-bitumen substrate of the mosaic of this variety is completely not afraid of water, it is possible to glue such sheets, including next to sinks, over bathrooms and sinks. But at the same time, this type of material can only be mounted on the walls and ceiling. Self-adhesive mosaic designed for the floor does not exist on sale.
What tools and materials are needed
Since the self-adhesive mosaic, in addition to the decorative layer, also has a sticky substrate, various brushes, spatulas and adhesive solutions are not used during its installation. Of the painting tools for applying such a finish to the walls, you only need a roller.
Also, a home master who decided to use a self-adhesive mosaic in the kitchen or bathroom will need to prepare a building level or a laser level. Such tools will subsequently be needed to perform markup.
In addition, for the installation of mosaic flexible plates, you will need:
a soft core pencil
Grout during installation of such sheets is usually not used. Self-adhesive mosaic on the wall and without it looks quite harmonious. In addition, to finish the walls with such material with your own hands, you will have to cook well-sharpened scissors. Such a tool will be needed for cutting material.
The main stages of installation
The procedure for designing a kitchen with a self-adhesive finishing mosaic usually includes the following steps:
thorough wall marking,
sticking the tiles themselves.
The assembly of the material of this variety is actually an extremely simple operation. Even a person who has never dealt with difficult types of facing materials will be able to cope with such work. However, at every stage of the work when finishing the walls with such a mosaic, all the required technologies, of course, must be observed exactly. Otherwise, the design of the kitchen or bathroom will turn out to be sloppy and unattractive.

Surface preparation
Many property owners note the fact that even on not-so-even walls, self-adhesive mosaic tiles look dignified and quite attractive. However, before installing this material, the walls, of course, should still be prepared in the most thorough manner. In this case, the finished decoration in the kitchen or in the bathroom will ultimately look as neat as possible.
For example, the procedure for preparing walls for mosaic finishing may include:
cleaning surfaces from dust, dirt and grease,
sealing cracks and chips,
Dust and dirt from the walls before gluing the mosaic can simply be washed off with a damp cloth. Alkaline household cleaning products are commonly used to remove oily stains. It can be, for example, a warm solution of laundry soap. In any case, before mounting the mosaic sheets, the walls cleaned with water must be thoroughly dried. It is impossible to glue such material on wet surfaces.
Chips and cracks on the plaster before gluing the mosaic plates can be repaired, for example, with gypsum putty. Such material is easy to install and also sets very quickly.
The most difficult procedure that you may have to perform before installing the mosaic on a self-adhesive basis is the alignment of the walls. Such an operation usually becomes necessary in the premises of houses of old construction. In such buildings, corners in kitchens and bathrooms can be heavily littered. In such rooms, at the joints of the walls, the mosaic sheets simply won’t lie flat. As a result, the finish will look ugly and messy.
Eliminate blockages of corners in rooms, usually by plastering walls using beacons. The procedure is technologically unfortunately quite complicated and it is better to entrust it to specialists. If the home foreman does not have plastering skills, and it’s too expensive to hire specialists, a mosaic in a room with obstructed corners can only be glued over a countertop or, for example, around a bathroom mirror. The remaining surfaces in this case should be simply decorated with wallpaper, decorative plaster, plastic panels, etc.
This way of designing a kitchen or bathroom can actually be a very good solution. Designers, for example, do not recommend using mosaics to decorate all surfaces in premises. The fact is that small tiles can make rooms visually less voluminous. In most cases, the mosaic still looks better in combination with other finishing materials.

What you need to know
Before proceeding with the installation of self-adhesive mosaics, the wall, of course, must be marked out. The fact is that the glue on such sheets, after they are pressed to the surface, hardens in literally 1-2 minutes. It will most likely be impossible to correct the material after its installation in any way. Therefore, applying such a mosaic to surfaces should immediately be as accurate as possible. The master has no right to make mistakes when installing flexible plates of this type.
How to mark the walls
Draw surfaces before installing mosaic tiles, usually as follows:
apply the building level to the wall in an upright position and draw a line,
30 cm back from the first line and draw the second,
repeat the procedure until the wall is completely marked.
In the same way, horizontal marking is also performed on the surface being trimmed. Ultimately, the wall on which the mosaic will be glued should be laid out on even squares measuring 30x30 cm.
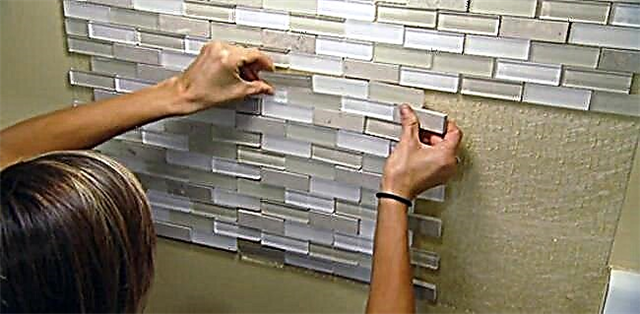
Installation technology for self-adhesive mosaics in the bathroom or kitchen
Actually, the sheets of such material themselves are attached to the walls according to an extremely simple technique:
the material is taken by the corner with the right hand, and the protective film is carefully removed from its back with the left,
they take the second corner of the sheet with their left hand, bring it to the wall and press it to its surface, according to the marking,
carefully level the sheet against the wall with your hands.
At the final stage, the 30x30 cm mosaic element is ironed with a paint roller, paying particular attention to the corners and edges. When mounting sheets assembled from tiles of different colors, of course, among other things, you need to carefully monitor the pattern.
Original way
They use self-adhesive mosaics for the kitchen or bathroom with the goal, of course, first of all to give these rooms a neat and solid appearance. But if desired, the design of the walls when using such a finishing material can also be made very original and unusual. To do this, during installation you just need to make a kind of "interweaving" between the mosaic sheets of different colors.
Before sticking tiles using this technology, you should draw a diagram of the future pattern. During installation, in this case, some mini-tiles are simply cut out of the sheets. These "excess" elements can subsequently be glued in the kitchen or in the bathroom, for example, in hard-to-reach places. Cutting sheets of self-adhesive mosaics using this technology can be done using ordinary sharp scissors. The rubber-bitumen substrate of such a material is cut very easily.

Useful Tips
Thus, the installation of self-adhesive mosaics is an extremely simple matter. To design a kitchen or a bathroom using this material even with your own hands can be done in just a couple of days. But in order to prevent the mosaic from being overrun and to do the job as efficiently as possible, when gluing the walls with such material, it is worth following the recommendations of experienced specialists.
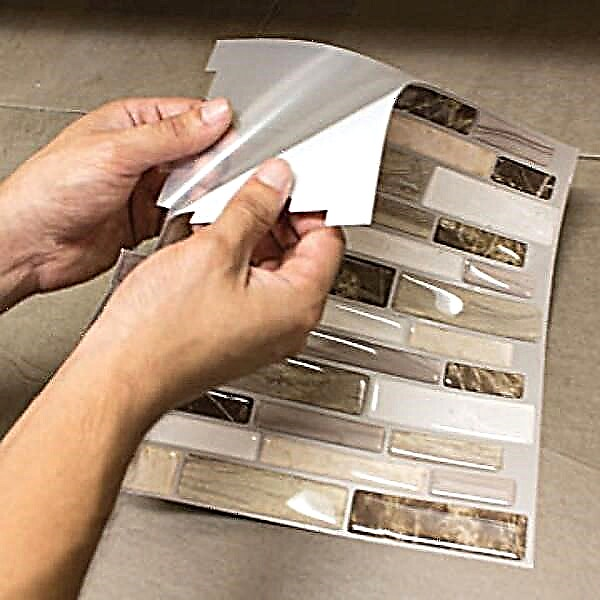
For example, to separate a film from a self-adhesive mosaic of the master it is necessary only immediately before its installation. Otherwise, the material will be hopelessly damaged. Bitumen glue dries on such flexible plates in just a few minutes.
Start laying self-adhesive mosaic tiles, as usual, should, of course, from below - from the floor of the room. If the ceiling after laying the mosaic for the row remains too narrow, the tile can simply be cut with scissors. In exactly the same way, if necessary, they are applied when mounting sheets in the corners.
What brand to choose and how much is the material
Experienced craftsmen advise to buy a self-adhesive mosaic only from trusted manufacturers. Unfortunately, completely substandard material of this variety may be offered on the market today. Such a mosaic in the future, most likely, will begin to fall off the wall, will fade in the sun, etc.

We have earned very good reviews from consumers in our country, for example, the material of this variety of the Veromar and Orro Mosaic brands. The Leroy Merlin self-adhesive mosaic is also very popular among domestic property owners. In rooms in apartments, including in the kitchen, such material, according to many consumers, looks simply great. A quality mosaic of this type is worth about 3-5 thousand rubles. for 1 m 2.
Features of modern mosaic
Mosaic tiles have a lot of advantages, which made it one of the leaders among materials for interior decoration. Finishing with this material should not be carried out according to the previous canons: when each element was individually selected and mounted on the wall. Such work is monotonous, tedious and lengthy. A modern mosaic ceramic tile is a fiberglass or paper cloth on which individual parts are already glued.
That is why it has the following advantages:
- Great appearance of the material. If you perform the installation correctly, then the "wow effect" is guaranteed.
- Easy installation. Despite the fact that the size of the mosaic tiles is small, it is formed into large sections, which are convenient to work with, as with ceramic tiles.
- Ease of care. The material is not afraid of moisture and detergents. It can be used for kitchen, bathroom.
- Products are not afraid of temperature changes.
- Cutting is done with a conventional mounting knife. Unlike the same ceramic influx, the process is much simpler, faster and does not require skills and expensive tools.
- Ecological cleanliness. The material is 100% safe for people.
- Long term of operation.
- High strength. Elements have a small surface area. And this means that they can withstand heavy loads without damage.

Note! Thanks to its flexible base, mosaic tiles are mounted not only on a flat wall, but also on complex structural elements that have rounded shapes.
Types of mosaic tiles
Before laying mosaic tiles on a wall or floor, it is important to know the types of products available on the market. So you can advantageously use the features of one kind or another. Varieties:
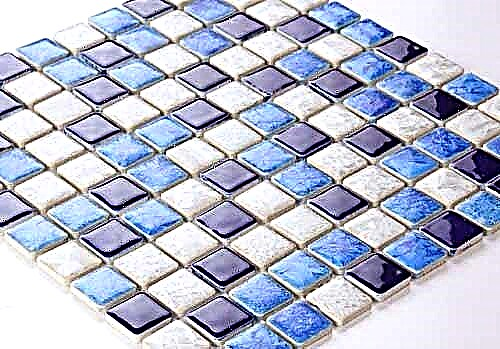
- Ceramic tile mosaic. This is one of the most popular options that has an affordable cost. The material is not afraid of moisture, friction and aggressive substances.
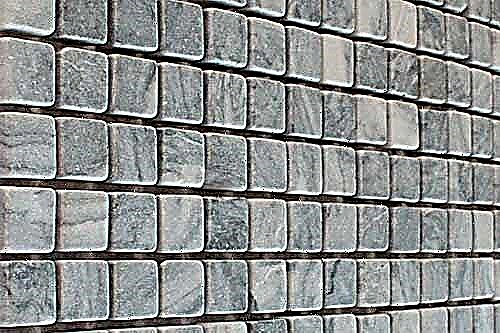
- Stone tile mosaic. Stylish and attractive option. Granite, jasper, and marble are used as raw materials. The cost of production is much higher.
- Glass mosaic. High strength, as it consists of hardened and specially processed material. It looks beautiful and lasts a long time. The sizes are different.


Note! The stores sell ceramic tiles for mosaics. This is an ordinary tile that only imitates the appearance of the mosaic.
As for the size and shape, they are different. The tiles themselves are small, there are 10x10 mm, 20x20 mm, etc. But in the form of flexible sheets, the dimensions are the same as conventional ceramic tiles: 20x20 cm, 30x30 cm or more.
The choice of adhesive for cladding
Before gluing mosaic tiles to a wall or floor, it is important to choose the right glue for it. All formulations can be divided into two groups: dry and ready-made. If we talk about dry mixes, these are cement-based compounds that should be diluted before installation. As for the finished adhesive compositions, they are sold in buckets and are ready for use. Epoxy-based reactive compounds and dispersion adhesives are produced.
Important! There is a difference between the laid tiles on the floor and on the wall. For the wall, the adhesive composition should have greater adhesion, since the mosaic can fall off under the influence of gravity on a vertical surface.
The question arises: what to glue mosaic tiles? It all depends on the conditions of use. For example, cement compositions can be used both outdoors and indoors. They are not afraid of moisture, therefore they are suitable for the pool, bathroom and kitchen.
For example, CERESIT CM 115 dry glue is made specifically for glass mosaics and natural stone products. BERGAUF MOSAIK is a white glue for a mosaic. It is recommended to use for pools. But Mapei Adesilex P10 is a super-white glue used for walls. Suitable for all types of mosaics.

Ready formulations also have different properties. Some of them are moisture resistant, others not. You need to pay attention to the packaging or consult with the sellers of the store whether ceramic tiles mosaic for the bathroom.
Each type of mosaic has its own adhesive:
- Ceramic products - white or gray cement-based glue. To finish the deformative base or non-absorbent, an elastic composition is used. And if the base is stable, then tile adhesive is suitable.
- Stone products - reactive glue or cement with quick-hardening properties. Marble is moisture sensitive.
- Glass products - it needs exclusively white glue. Selected from cement or polyurethane compounds.

Preparatory work before laying
Before you learn how to glue mosaic tiles on the wall, it is important to take care of the quality preparation of the base. Walls or floors should be flat, clean and smooth. Otherwise, this will affect the appearance, as the flexible canvas will repeat all the surface irregularities.
The preparation of the foundation includes the following stages:
- Checking the smoothness of the surface. This can be done by level or rule. If the differences are small, then they can be leveled with a layer of adhesive. But, the method is not always suitable. Large irregularities, cracks and defects are best leveled with a layer of plaster. If the differences are very large, it is rational to switch to the use of moisture-proof drywall.
- Surface cleaning. There should not be saws, debris or other dirt on the wall. The relief parts are also removed. The coating is wiped with a clean cloth.
- Primer. It will be required to improve the adhesion of the surface to the glue. It is applied to the entire wall or floor in two layers with a break for drying. Materials: roller and brush.
Stage 1 - markup
To simplify the process and make laying easier, markings are made on the wall or floor. It is especially needed in cases where a certain pattern is formed on the wall or floor.

For starters, a “dry” layout and markup on it is performed. This will determine the exact location of the tiles and correctly lay out everything by color. When the drawing is laid out, the tile is fixed with tape and numbered. Based on the layout, it is important to sketch. There are some nuances that relate to the development of the drawing:
- The layout is performed from the most illuminated area or from the center of the picture.
- If there are external corners on the surface, then it is recommended to start the layout from them.
After all the manipulations, the mosaic from the ceramic tile is removed and prepared for installation.
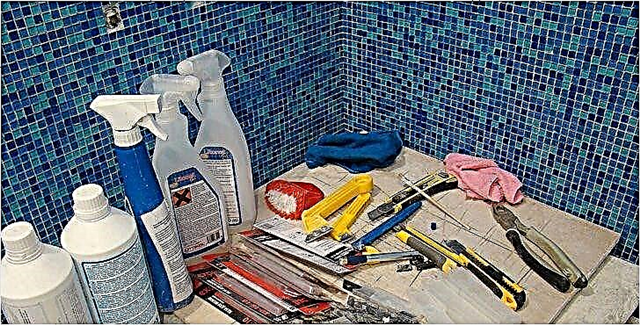
Stage 2 - preparation of tools and glue
To do the job, you need to have the following tools and materials:
- moisture resistant primer, with additives against fungus,
- glue for mosaic,
- grout mixture
- notched trowel,
- rubber spatula
- primer roller,
- a mixer for preparing glue (if it is a dry mixture),
- bucket for glue.
The adhesive is kneaded according to the instructions on the package. To do this, it is enough to have a bucket, water and a construction mixer. Kneading rules:
- First, water is poured into the container, and then a dry mixture, but not vice versa.
- The glue must be mixed twice. When cooking, then leave for 5-10 minutes, then mix again.
- Mixer speed should be medium.
Stage 3 - sticking the mosaic
The moment has come when you can glue mosaic tiles. The process itself is very similar to working with ordinary ceramic tiles. The sequence is as follows:
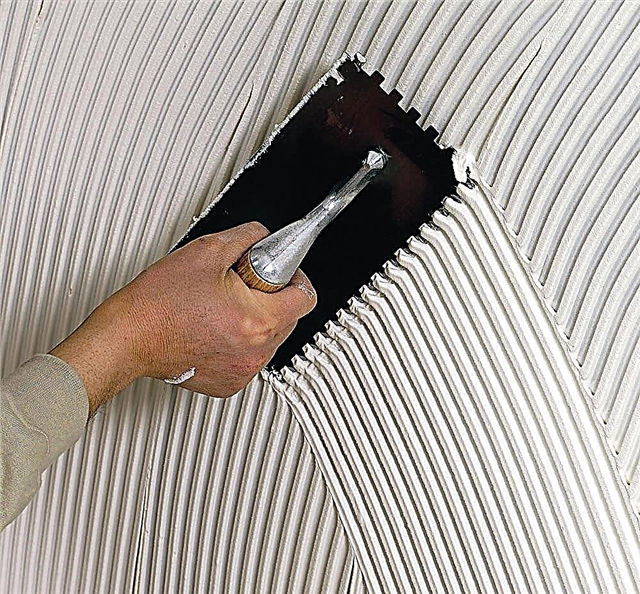
- An adhesive composition is applied to the prepared base. This is done with a notched trowel. It allows you to create grooves on the surface. At the same time, as much area is covered at a time as the master can veneer in half an hour. Otherwise, the adhesive loses its effectiveness.
- Before sticking the mosaic tile, pay attention to the drawing, if it is with a pattern. The sheet is carefully applied to the wall or floor. To evenly distribute glue, gently pass along the mosaic surface with a roller. In this case, the distance between the tiles should not be violated, and the adhesive solution should not fall on the mosaic.
- The film is carefully removed, and the mosaic is left to dry for 1-2 days. If the mosaic needs to be trimmed, this is done with a mounting knife. Excess glue is removed 30 minutes after gluing the mosaic. If you do this later, then difficulties can not be avoided.

Note! Stepping on freshly laid tiles is prohibited. It can only be loaded after it has dried and finally dried.
Stage 4 - grouting
After the ceramic tile for the mosaic for the bathroom or other room is fixed, you need to perform jointing or grouting of the seams. It is done like this:
- The grout mixture is prepared according to the instructions.
- To make it easier in the future to clean the mosaic from grouting, you can protect it with a special spray. After 30 minutes, everything is ready for grouting.
- A mixture is applied to the rubber spatula, after which all seams are filled with diagonal movements. To push the mixture into the seams, you need to lightly press on the spatula.

- The mixture needs to be moistened. To do this, you can slightly moisten the surface with a spray bottle or sponge.
- After 20 minutes, the grout will harden. Then you can clean the remains using a damp, hard sponge.

- At the end, the mosaic ceramic tiles for the bathroom are washed with water.


Note! Marble products require a special approach and accuracy when grouting. The mixture can enter the pores of the stone and affect its color.
Proper mosaic care
- Facing in the bathroom needs periodic treatment with fungicidal compounds. They will help protect the surface from mold and mildew. This is especially important for bathrooms where there is poor ventilation.
- Cleaning products should not contain abrasive substances, only in the form of a gel without solid particles.
- Dirty places are wiped with a soft sponge. It is wetted in a soapy solution. It remains to wash the surface and wipe it dry.
- Do not rub the tiles with wax, oil-based substances and phosphoric acid compounds.
These tips will help to care for and extend the life of the cladding after you have been able to glue the mosaic tiles.
Conclusion
Ceramic mosaic on the grid is an easy way to achieve a beautiful, reliable and durable surface. The material has a lot of advantages, and the laying process itself is simple. Even a novice can handle it, if he follows the instructions and recommendations.
Rate the article, write a comment, and if the article was pleasant and useful, share it with your friends.
Mosaic Tools

For laying mosaic tiles you will need the following materials and tools:
- glue for styling,
- mosaic tiles
- grout for joints,
- tape measure, pencil, building level,
- small grinder with stroke control + discs for stone / ceramic, tongs for cutting mosaics,
- container for stirring glue,
- drill mixer
- toothed (corrugated) spatula with a tooth stroke of up to 5 mm,
- one and a half to 30 centimeters,
- rubber spatula
- ordinary spatula
- water tank + sponge with soft and rough sides,
- felt or bike rag.
Preliminary marking
Before you start laying the mosaic, you need to carry out a preliminary layout. This is especially important if you are doing this kind of work for the first time. First, sketch on a piece of paper (a kind of project). Then the markings can be transferred to the wall. In this case, you should pay attention to some nuances:
- if the room has external corners (boxes or slopes), then the drawing should start from them,
- if there is any decorative element on the wall (mirror or panel), then it also becomes a priority,
- try to remove all possible clippings in subtle angles (for example, the corner of the front door).
When transferring markings to the wall surface, be sure to use a level. After all, it depends on how well the mosaic on the wall will look.
The main thing is to clearly draw the bottom line along which the first row will be laid out. If the mosaic is laid on the floor, it is advisable to make a "dry" layout.
Kneading and glue application
The glue consistency should be optimal (thick rustic sour cream) to hold the mosaic module on a vertical surface. We apply glue to the wall or floor with ordinary spatulas, as if we were puttying. We apply glue to exactly four mosaic tile webs. After we pass the applied glue with a notched trowel. You can bottom-up, you can side to side. Smear the excess solution remaining on the spatula next to it on the wall.
If you have chosen a two-component adhesive for gluing a mosaic, do not try to mix it in proportions. Mix everything at once: both glue and fixative. Separating the glue itself and the thickener, you are at the risk of not getting into the right consistency.
Mosaic Stacking Process
Before gluing the mosaic to the floor and walls, I should tell you a little about its types.


Mosaic tiles are divided by type of substrate. There is a mosaic tile with paper backing and mesh. The main thing to remember is that mosaic tiles on a paper basis are glued with paper to themselves, and mosaic tiles on a grid should be put on the glue with this grid.
Gluing the mosaic on the grid is much easier, because a uniform seam is immediately formed.
If the so-called “paper” technology is selected, then the modules are glued with a mosaic, the paper should be facing out. It is convenient to press the module on the paper side with a conventional rubber roller for wallpaper gluing.
If you know how to mount a regular tile, then you will quickly figure out how to tile the mosaic. The principle is very similar, there are only some nuances.
Having missed with glue on four tiles, we lay the first mosaic. After, slightly pressing it with the help of one and a half, we set it in the level and with the one and a half carefully, as accurately as possible, smooth it on the wall so as not to bring down the set level.
While you are laying the fourth square of the mosaic tile, you will need a bucket of water, since the first square is already perfectly stuck, and it's time to remove the paper on which the mosaic was attached.
If you have several mosaics falling off with paper, it's okay! Just glue them separately with glue and insert them into place. Well, it just happens!
So, for example, an ordinary tile (when laying on the walls) is mounted from below. The bottom row will be the holding base for the top. There is no need to do this with mosaic tiles. They weigh a little, so you can start installation from any place you have planned.
As a rule, at first, an angle is laid out that catches your eye when entering the bathroom or kitchen, and after already from the result, stretch the mosaic canvas across the wall.
The mosaic tile leans against the adhesive mass and is slightly pressed. Here you should carefully look at the seams. Using plastic crosses (as in the case with ordinary tiles) is unlikely to work. Everything needs to be done "by eye".

Note! If during installation on the walls the glue does not immediately set, then the tile may move a little. In this case, small cloves will help. They are inserted into the seam and hold the material in place.
As soon as the square is laid, you need to walk on it with a plastic pad with a nozzle made of elastic material. Use it to lightly tap the entire finished surface. At the same time, your actions should be moderately strong and short.
Half an hour after laying the square, it is necessary to remove the protruding excess glue. This is done gently with a stick or brush with a hard pile. You can also use a small spatula or screwdriver to clean the seams from the glue.
Grouting
You need to start grouting the joints a day after laying.

It is recommended to wipe the seams with two-component compounds. It is preferable to purchase an adhesive that has antifungal properties.
For this work, a rubber spatula is used. Inspect all seams before grouting. Remove protruding adhesive residues and debris from them. The grout itself is produced by brush strokes in different directions. The last pass must be perpendicular to the previous one.
After grouting, the excess must be removed. If you use waterproof material, then this is done immediately. The water-soluble grout is given for 10-15 minutes, then it is removed with a damp cloth.
Grout residues may appear on the surface of the mosaic, so they should be removed with a damp sponge or cloth. When everything is dry, the stacked modules are wiped clean.
Mosaic Care
In order for the purchased mosaic to please you for many years, you need to properly care for it. It is better to use neutral detergents recommended by manufacturers. When cleaning heavy soiling, use low acid detergents, remembering to rinse thoroughly with water, the treated area.