- 1 Basic properties
- 2 Production of liquid wallpaper at home: instructions
- 2.1 the Recipe for making liquid wallpaper from paper
- 2.2 How to make wallpaper from sawdust
- 2.2.1 Additives
- 2.2.2 Video
- 3 Application of liquid wallpaper: step-by-step technology
- 3.1 Wall decoration
- 3.1.1 Preparation for application
- 3.1.2 Video
- 3.1.3 Application Instructions
- 3.1.4 Video
- 3.2 Application of liquid wallpaper on the ceiling
- 3.2.1 Video
- 3.2.2 Liquid Wallpaper Pattern
- 3.2.3 Video
- 4 Prices for ready-made mixtures
- 5 Photos of liquid wallpaper in the interior
When creating a unique interior, a special role is given to wall decoration, because it is on them that the eye is drawn in the first place. In the pursuit of beauty and comfort, many resort to original methods of decoration. Liquid wallpaper is very popular among masters today. They are applied to the surface with brushes, rollers, spatulas and other similar tools.
Although today the ready-made mixture is easy to buy in the appropriate store, they can be prepared at home. This is not to say that this is a simple solution, however, fans will do everything on their own, the technologies described in this article will appeal to you. Therefore, before making a liquid wallpaper, we recommend that you familiarize yourself with the presented material, as well as watch the attached videos.
Basic properties
 Liquid wallpaper is natural and does not harm humans
The main thing that liquid wallpaper is valued for is environmental friendliness. For their manufacture, natural materials are selected that do not harm the environment and the human body. You can highlight a number of positive aspects and features of this finishing material:
So safe that they are recommended for use in the decoration of escape routes. According to the tests, their low ability to maintain flame, smoke formation, a slight degree of flammability and combustibility was noted.
Using all kinds of additives, you can give the room a special appearance. At the same time, it is possible to create completely different interior styles.
Simplicity in work
To work with this material you will need a simple set of construction tools. There is no need for special qualifications and skills. With a strong desire, you can independently understand the technology of their manufacture and application. Plus, the wall does not have to be perfectly smooth. Some abrasions, small bumps and other irregularities are allowed. An important requirement is the primer on the base surface.
If a draft is unacceptable when gluing ordinary sheet wallpaper in a room, then with liquid it is the other way around. The drying process is significantly accelerated if constant air exchange is maintained in the room. Given this, the presence of draft is even recommended.
Liquid wallpaper during operation does not require special care. There is no need to regularly clean them for the reason that they do not attract dust and other impurities.
Even if the wall surface is curved or simply straight, joints are not formed when applying liquid wallpaper.
 The special structure of the wallpaper allows you to create a seamless coating
Decorative finish is an additional heat-insulating layer. With all this, the walls let air through, which positively affects the overall indoor microclimate.
The textile fibers contained in the liquid wallpaper create an additional barrier to the penetration of sound.
UV resistant
If the coating will be exposed to sunlight for a long time, it will not change its color and technical characteristics.
Frost resistance
Subject to the technology, wallpaper can be applied in poorly heated rooms and in conditions of sudden temperature changes.
One of the important advantages is maintainability. They can be reapplied to the defect. After the repair, it will not be possible to determine the area where the restoration was made.
 If necessary, after a while, the wallpaper can be repaired
Given this, some experts recommend buying wallpaper with a small margin in case of repair. Accordingly, there will be no problems with the selection of colors and shades.
Based on all the positive aspects and features, such a finish will last more than one year.
Making liquid wallpaper at home: instructions
As already mentioned, you can make liquid wallpaper yourself. In this case, you can save a lot. For example, the cost of one package of dry mixes ranges from 400 to 2 thousand rubles. On average, one package is designed for 3–7 m 2. Based on this, you can approximately calculate how much material is needed to finish the walls in your case.
We will carry out approximate calculations: the area of one room on the floor is 15 m 2, the height is 2.7 m. With these parameters, the area of all walls will be about 40 m 2. If you buy liquid wallpaper with an average price of 1100 r, then we get this calculation - 40 (total area of the room) ÷ 5 (dry weight in one package) = 6 (required number of packages). The result obtained is multiplied by 1100 p. and we get 8800 p. With all this should be purchased with a small margin.
Not everyone can buy even the cheapest wallpaper. Therefore, for most, it will be an excellent decision to make them yourself. Next, we will consider options and recipes for making from:
The recipe for a liquid paper wallpaper
First of all, it is necessary to collect all kinds of leftover paper. Although absolutely any residues are suitable, it is better to give preference to better quality raw materials. You can also use wrinkled paper. Water will be required, its temperature should be above room temperature. Be sure to select a dye and gypsum. To make liquid wallpaper easy to apply on walls, you can not do without a special adhesive composition. Most use PVA glue. To prepare the base, a primer must be applied, preferably with a deep penetration.
 Newspapers or cardboard packaging from waste paper can be a source of raw materials.
Among other things, you will need such a tool:
- drill or screwdriver,
- mixer nozzle for mixing all ingredients,
- container made of metal or plastic. The size of the tank doesn’t matter
- putty knife,
- brush for priming walls.
Consider the manufacturing process on the example of a small portion. Based on the needs, the proportions can be increased proportionally:
A detailed description of each step in the manufacture of liquid wallpaper
Take 200 grams of paper, previously chopped it. For this, you can use ordinary stationery scissors.
 You can use a paper chopper with success.
The cut paper must be mixed with water. 200 grams of paper will require up to 1.5 liters of room temperature water.
 It is necessary to fill the paper with water
After mixing thoroughly, leave the mixture to soak for one hour (conditionally). It is important to consider that paper can absorb moisture in different ways, its density affects this indicator.
 Stir and leave to swell
Therefore, in most cases, the time of soaking and swelling is determined individually.
At the next stage, you should take a screwdriver with a mixer nozzle and mix everything thoroughly until a uniform consistency is obtained.
 Mix with a mixer until smooth.
 Add color to the mixture
When stirring, you can add dye, synthetic fibers (this can be an ordinary clothesline, cut into segments of 3-5 cm), PVA glue (20 ml is enough for our mass), sparkles to give a special effect, cotton wool (you need to finely chop) and so on. .
 PVA is added
After adding all the ingredients, the mixture should again be thoroughly mixed with a mixer.
 Everything is thoroughly mixed
The last thing to add is gypsum. Immediately after that, the liquid wallpaper is ready for gluing.
 Gypsum is added before application.
It is worth recalling once again that the proportions are conditional. In order not to spoil a large volume of raw materials, we recommend that you first experiment on a small volume. After you will understand what else needs to be added and to what extent. Then just increase the proportions and make the main volume.
 Ready-made liquid wallpaper can be applied with a metal spatula
After analyzing the composition, it becomes clear that self-production is much more economical than buying ready-made wallpapers in a store.
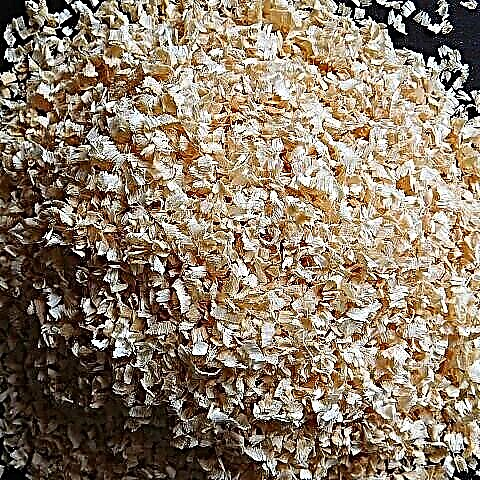
How to make wallpaper from sawdust
 Liquid wallpaper can be made from sawdust
Sawdust can be used in the manufacture of wallpaper mixture at home. Sawdust itself has a number of positive properties:
- the degree of sound insulation is increased,
- additional layer of thermal insulation,
- environmentally friendly material,
- prevent mold.
To make liquid wallpaper from sawdust, you will need:
- 1 kg of sawdust
- 500 g of gypsum
- 500 ml PVA glue,
- 5 l of water
- pigment.
The manufacturing process is similar to that described for paper. You need to fill the sawdust with warm water and give them time to swell - on average about 4 hours. After that glue, pigments and other additives are added as desired. The resulting composition must be thoroughly mixed and left for 12 hours. At the end, add gypsum and mix thoroughly with a construction mixer until smooth.
After gypsum is added to the mixture, it should be immediately applied to the surface.
Additives
 Additives for home-made wallpapers, they can be of different colors and structures.
At the heart of any liquid wallpaper should be fiber. It can be plain cotton wool, cellulose or cotton. You can also use linen, wool, synthetic winterizer, synthetics, silk and the like. The main task is to finely chop the filler. You can experiment with different fillers by making a small volume with different components. The result that suits you the most can be used.
Among other things, binders are needed. In most cases, home craftsmen use PVA glue. If it is not, then you can replace it with ordinary wallpaper glue or acrylic putty. In the latter case, the casting will acquire a sufficiently high strength and will be resistant to various kinds of influences, including mechanical ones.
 As a decorative filler, sparkles are great
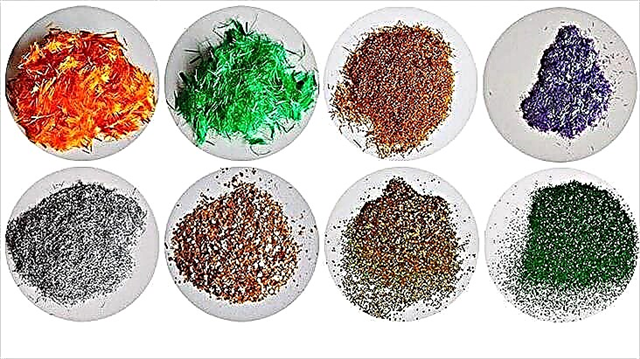
To give a special appearance, decorative components are also added to the mixture. It will be possible to use:
- crumb quartz
- marble chips
- a crumb of mica
- sparkles.
All of these materials do not cause mold. Moreover, they can be bought at a hardware store for a small amount. Well, the last important component is dye.
A bit about liquid wallpaper
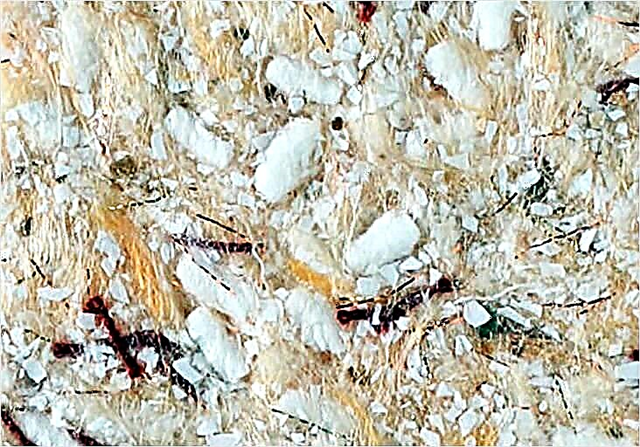
Liquid wallpaper resembles decorative plaster by application method. After drying, the treated surface resembles pasted over with classic roll wallpaper. Only the coating is more textured. The mixture evens out the roughness of the walls, is convenient for adjusting angles and applying to semicircular arches.
For the base of liquid wallpaper, manufacturers use cellulose fibers, which are produced from the waste of the woodworking industry. These particles increase in water and decrease after drying. Initially, the fibers are white, then they are dyed in the required shades.
Cotton is added to the composition; bleached cotton is usually used. It is this component that gives the coating volume and helps to hide minor imperfections in the substrate.
The composition of expensive wallpapers include silk fibers. For these purposes, silk wastes are used (fibers that are not suitable for the production of textiles).
As a binder component use wallpaper glue or PVA. For greater attractiveness, decorative additives are added to the mixture: colored fibers of wool and synthetics, marble chips, chopped mica, sparkles. These components do not have technological significance, they are used for beauty.

Technology for applying liquid wallpaper
Finishing with liquid wallpaper is carried out in a certain sequence. The application procedure is described on the packaging of the material.
Pay special attention preparation for application to the wall and surface treatment:
- Completely remove the old wall covering.
- Isolate the electrician with masking tape.
- The floor is covered with a film.
- Primer the surface, cover with two layers of primer. Select a water-repellent material with a concentration of 1: 5 - 1:10.
Each primer coat dries in 12 hours. Between the two wall treatments, the roller is not washed, it is wrapped in cellophane. It is convenient to use a tinted primer to visually control the processing of the walls. Take into account that color processing can appear on light wallpaper, so tinted material is used when applying dark color wallpaper.
Follows first prepare liquid wallpaper:
- The dry mixture is diluted with water. To do this, the contents of the package are poured into a deep basin or plastic bucket.
- Pour water in the amount indicated on the package.
- Thoroughly mix the mixture.
- The resulting mass is transferred to the bag, tightly closed and left for 12 hours to saturate with moisture (ripening). Over time, you may need to add small amount of waters.
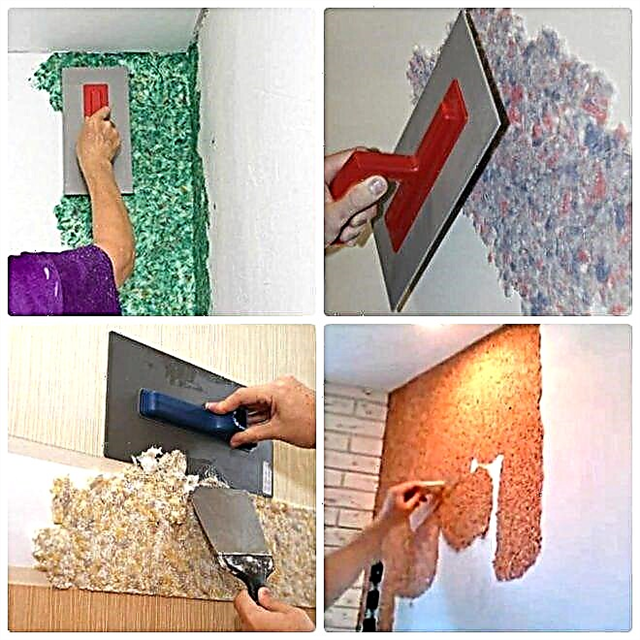
Drawing on a surface of walls and a ceiling:
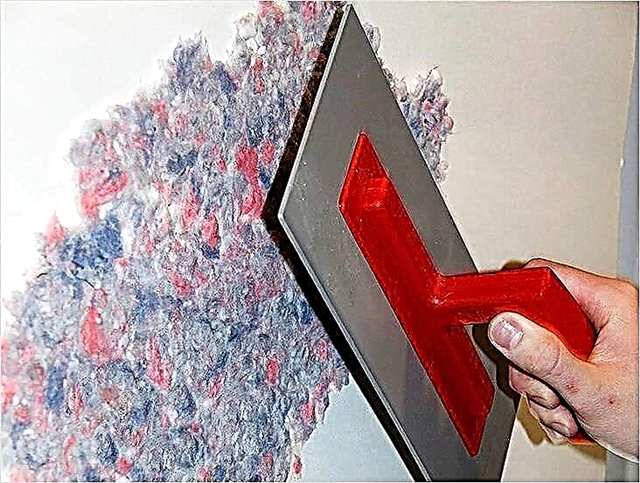
- The plastic mass is applied using a trowel. It is convenient to use a transparent plastic tool. The entire finishing process is identical to the putty.
During operation, the trowel is not applied completely to the surface, it is used at an angle of inclination of 15 °.
- The material is taken by hand and applied to the base of the trowel, or directly to the surface to be treated. The master works the way he most conveniently. The mass is applied evenly. Permissible layer thickness is 1–8 mm.
- A new portion of liquid wallpaper is applied at a distance of several centimeters from the already applied. On top of the distributed material, experts do not recommend applying a fresh portion.
- It is necessary to cover the entire area (wall, ceiling) at a time. The dried mass cannot be combined with fresh.
DIY wall decoration
Masters highlight features in applying liquid wallpaper on the wall:
- At first, sockets and switches frame the liquid wall, so the surface of the wall will turn out perfectly smooth and no transitions will be visible.
- Plastic mass is applied, starting from the upper right corner in the direction to the left and down.
- The processing of the inner corner is done in the direction from the corner, the outer - to the corner.
- The trowel moves from the ceiling above the wall, and from the floor below.
After applying wallpaper on the entire wall independently control uniformity. To do this, lateral light is sent to the wall. So all possible roughness is visible. Defects are corrected with a large trowel dipped in water.
The installation of switches and sockets should be done immediately after applying the wallpaper, then the work will look neat.
Liquid wallpaper completely dries in 24 hours.
Application of liquid wallpaper on the ceiling
The process of applying wallpaper to the ceiling has some differences from the processing of the wall:
- Masters recommend adding extra surface roughness for better traction.
- The process of applying a spatula is very time-consuming and painstaking. Experts recommend using a spray gun, and then level the surface with a roller.
- The most important thing when processing the ceiling is the consistency of “liquid” wallpapers. If the mass is too much fluid, then it drains from the surface, too thick - it will lie badly and fall off. Before work, the mixture is tested in a small area.Water or dry materials are added to create the perfect consistency.
Option One - Paper Waste
Waste paper is the most affordable base to create. homemade and not expensive liquidwallpaper from improvised means. Emission paper is not valuable, but is a source of pulp for the finishing mixture. Choose notebook sheets, children's coloring, newspapers, old paper wallpapers. The pages of glossy magazines are not suitable for these purposes, as they dissolve poorly in water. Thick paper and cardboard are also not suitable.
The sequence of actions in the manufacture of the finishing mixture of paper waste:
- The paper is crushed (cut, torn, use a special shredder).
- Pour warm water in a ratio of 1: 5.
- Leave for 12 hours.
- They make a homogeneous mass of paper and water using a construction mixer or drill with a special nozzle. A mixture of paper and water turns gray. Cooking such liquid wallpaper is the cheapest available technology. To obtain a white mass, use clean paper.
- Finely chopped cotton wool is added and mixed into the resulting mixture, the ratio by volume is observed 4: 1. At this stage, no longer use a mixer, mix with your hands. Instead of cotton wool, it is allowed to use a synthetic winterizer or other similar material.
- Introduce small pieces of wool threads of any color in the amount of 1/8 of the total mass.
- Pour spangles, pieces of tinsel, mica. The amount of decorative additives should be no more than 200 g per kilogram of paper. Manufacturers may change a little proportions.
- Add PVA liquid glue in an amount of approximately ½ of the original amount of paper. It is permissible to use CMC glue in dry form. It will need 200 g per 1 kg of paper. Glue is a bonding component. If it is added dry, then some more water will be needed.
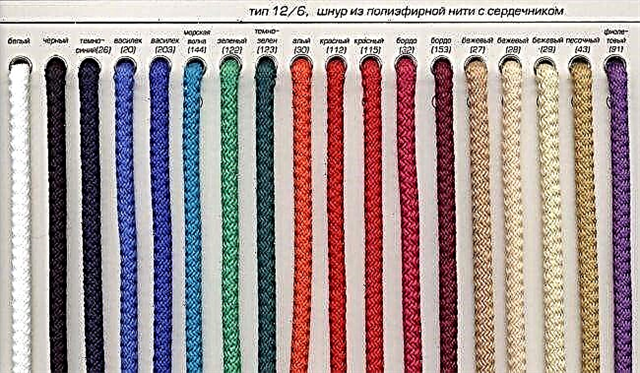
- Dyes added. Its amount depends on the desired color. Kohler can evenly intervene in the mass or leave in the form of splashes and spots to obtain volumetric color transitions. The manufacturer himself determines the intensity of future wall painting. The dye chosen is intended for water-based paints.
- Made the mixture is placed in a plastic bag. If it is too thick, you can add water. You can use the material after 12 hours, it is stored for about a week. After exposure, the mixture acquires a uniform consistency.
- Before applying the wallpaper, gypsum is added to the mass (0.5 kg per 1 kg of paper) and mixed thoroughly.

If waste paper is taken for the base, then the bright color of the coating cannot be obtained. These materials will result in a muted or dark color. Vivid colors are obtained using pure white paper, the purchase of which involves additional costs.
The structure of the future coating can be changed by adjusting the size of paper shredding. The smaller the pieces, the smaller and more inconspicuous the relief will be. If you cut the paper larger, you can create the effect of river pebbles.
The recipe for a finishing material from paper
Exemplary composition of liquid wallpaper and the ratio of the components of the mixture:
- paper - 1 kg
- water - 5-6 liters,
- cotton wool - 250 g
- woolen threads - 100 g,
- PVA glue - 400 ml or dry CMC glue - 200 g,
- sequins and other decor - 200 g,
- dye - from 2 caps,
- gypsum - 500 g.
Option Two - Use of Fibrous Materials
Making liquid wallpaper from other materials do it yourself - the process is more time consuming. It is more difficult to work with cotton or ecowool than with paper. If you need to decorate a small area, then the fibrous material is cut with scissors. To repair the whole room you will need a lot of material, grind it with a drill with a nozzle-mixer.
In addition to cotton wool for the manufacture of the finishing mixture you will need:
- Glue (wallpaper glue based on natural casein, PVA, bustilate) as a binding component.
- Acrylic putty to give wear resistance to the coating.
- Dye.
- Decorative elements.
To cook such liquid wallpaper at home:
- Grind the base.
- Pour it with the selected binder in a ratio of 1: 1 and mix.
- Add the necessary amount of dye and decor elements, mix thoroughly.
- Leave for 8 hours for impregnation.
- Before applying, putty is added to the mixture.
Cellulose fibers can be replaced with woolen, linen or synthetic winterizer. An additional component can be leftover yarn for knitting, as well as old knitted socks and sweaters. It is recommended to chop yarn and thread with a knife for cutting cabbage.

Features of applying homemade liquid wallpaper
The main difference in the use of self-made finishing materials is the exclusively manual application method. A spray gun or air gun is not suitable for these purposes.
Some home craftsmen advise an additional step in preparing the surface for applying the material. After processing with two or three layers of primer, it is recommended to paint the wall with water-based paint. It is believed that under such conditions, grip will be better.
So, making liquid wallpaper perhaps at home. So the masters get a replacement for the popular and expensive finishing material. Moreover, the result obtained in quality is not inferior to factory analogues. Of course, subject to proper preparation of the surface that is planned to be glued. The point of using cotton wool and other non-paper materials is only if they are excessively present in the household. Otherwise, such mixtures can cost no less than those offered by industry.
Preparation of working solution from the finished mixture
Before you start making liquid wallpaper with your own hands, you should prepare the dishes. To conveniently stir the solution, the container should be round (a container with a diameter of 0.5-0.6 m will be sufficient) and shallow (up to 0.3 m). Due to the fact that liquid wallpapers are easily washed, you can also use kitchen utensils for their preparation.
To prepare the working mixture you will need water. Its temperature does not matter to create a quality solution. But it is better when the water temperature is in the range of 20-25º. In warm water it will be more pleasant to stir liquid wallpaper with your hands.
As for the number of bags to be stirred, it is recommended to prepare a solution of 1-2 packages. This is explained by the fact that it will be difficult to stir a large amount of the mixture to the optimal consistency. Several packages of liquid wallpaper are mixed only if they belong to different lots of goods.
The process of manufacturing liquid wallpaper itself involves the following actions:
- so that there are not many lumps, the bag with the mixture is shaken,
- the contents of the package are poured into the prepared container,
- the dry mixture is covered with 5 l of water,
- the solution is mixed by hand until a homogeneous mass is obtained,
- the optimal consistency of the solution is obtained by the gradual addition of water to it.

Usually 1 pack of liquid wallpaper is mixed with 5.5-6 liters of water. The consistency of the working solution should resemble a thick cream. It should be noted that too thick a mixture will be difficult to apply to the walls or ceiling, and too thin a solution will drain from the surface.
Some types of liquid wallpaper leave for 7-8 hours. After normal swelling, the finishing material is thoroughly mixed again. If necessary, a small amount of water is added to it.
Beneficial features
Reviews of people who used liquid wallpaper to decorate the walls confirm the undeniable advantages of this unusual building material. Here we can talk about such positive aspects as:
The composition of the liquid wallpaper includes glue, which when dried, it acts as a protection against pungent odors. There will be no odors even when mixing and applying, the residents of the apartment will not have to leave for the time of repair.
Liquid wallpaper has excellent antistatic properties, which positively affects the cleanliness of the air due to the absence of dust accumulations on the wall surface. The antistatic property is due to the naturalness of the components that make up this material.
Thanks to all the same natural components, this material is fireproof. The components self-extinguish even at the slightest fire, and also do not emit caustic toxins, which can lead to poisoning of people.
Liquid wallpaper contains a large amount of cellulose, which is not affected by moisture and perfectly maintains the microclimate in the room.
Speaking about the advantages of the described material, the composition was repeatedly mentioned. It is necessary to disassemble in more detail its components.
Composition
The described material consists of three main components:
- most of it is natural fiber - cellulose, cotton or silk - is selected at the discretion of the buyer, since in the finished form they are slightly different from each other,
- natural fiber is mixed with a water-based dye (pure white formulations available),
- the composition is supplemented with a binder material - acrylic dispersion or glue, which makes it easy to apply the mixture to the walls with a spatula.
If desired, when the master himself makes the composition, he can add marble chips, spangles of mica or colored flocks, if the design of the room where the repair is required requires.
So, the wallpaper is afraid of direct water, but do not rush to put an end to them. If you want to use this material for wall decoration in the bathroom, do not apply them directly above the bath or in the shower. Otherwise, protective varnish can be applied to the surface of dried wallpaper. It is colorless, not susceptible to moisture, it is purchased in construction stores along with decorative materials.
The price of finished mixtures
Isn’t it easier to buy ready-made mixes for liquid wallpapers? Let's calculate how much they will cost. Of course, talking about the approved price is impossible, since there is a differentiation of the fundamentals in the form of the composition of the material.
It also takes into account material consumption per 1 m 2 . Based on the above example, the contents of the package will be enough for 8 or 3.5 m 2, respectively. Now you need to calculate the area of all your surfaces and divide it by consumption. It will turn out the number of packets, multiply by the cost of the selected mixture and get a decent amount. Repair is always expensive, you see, it will be nice to save on liquid wallpaper. Moreover, to realize that he himself made them.
In the video below, this issue is discussed in more detail, and they will also tell you about a rich assortment of mixtures.
How to make at home?
So, liquid wallpaper is not difficult to make at home almost from improvised means. Of course, you will have to spend a little time preparing the composition, but if you take into account the cost of the material, then you can tinker. The advantage of this process will be your awareness of the natural composition. The most popular and correct way is to use waste paper.
Preparation for application
The wall should be free of all kinds of dirt, paint residues, putties, metal or plastic elements and the like. Ideally, when the entire surface is plastered and primed. In this case, they will not greatly absorb moisture.
If we talk about the preparation of liquid wallpaper, then you should not do them in large quantities. Why? With large volumes, it is extremely difficult to derive the exact proportions. It is also difficult to achieve a uniform consistency. Experts recommend kneading small portions in the amount that you can work out in a short time.
 Preparing walls before applying liquid wallpaper
On average, about 4 kilograms of liquid wallpaper is required per 4 m 2. Given this, you can determine how to make the volume of the mixture.
With all this, a small residue is recommended to be mixed with a new one. This is necessary, since it is quite difficult to bring out the perfect shade. Mixing the old mixture with the new one, you level this difference. Although, if you adhere to the exact proportions, you will not have such a problem.
Video
Application of liquid wallpaper: step-by-step technology
It is important to familiarize yourself with the technology of applying liquid wallpaper. First of all, pay attention to the preparatory work.
Wall decoration
 The process of applying liquid wallpaper on the wall
Often in old Soviet houses you can find that wallpapers are pasted in several layers, even modern vinyl or paper can be glued on top of each other. Although experts do not recommend this, this is possible, however, only under one condition - when the base of the walls is strong enough.
As for liquid wallpaper, then this is unacceptable. They must be applied directly to the surface, completely cleaned from the old coating. For this reason, special attention should be paid to the preparation of cultivated areas. This is where the work should begin.
Preparation for application
The wall should be free of all kinds of dirt, paint residues, putties, metal or plastic elements and the like. Ideally, when the entire surface is plastered and primed. In this case, they will not greatly absorb moisture.
If we talk about the preparation of liquid wallpaper, then you should not do them in large quantities. Why? With large volumes, it is extremely difficult to derive the exact proportions. It is also difficult to achieve a uniform consistency. Experts recommend kneading small portions in the amount that you can work out in a short time.
Preparing walls before applying liquid wallpaper
On average, about 4 kilograms of liquid wallpaper is required per 4 m 2. Given this, you can determine how to make the volume of the mixture.
With all this, a small residue is recommended to be mixed with a new one. This is necessary, since it is quite difficult to bring out the perfect shade. Mixing the old mixture with the new one, you level this difference. Although, if you adhere to the exact proportions, you will not have such a problem.
Video
Application Instructions
It is most convenient to apply liquid wallpaper with a transparent plastic grater. Working with it, you will immediately figure out how to distribute the mixture on the surface of the walls. The finishing process itself is similar to putty. The main goal is uniformity. The optimal layer is considered to be a thickness of 1-2 mm.
In the course of work, it is inadmissible to apply the grater with the entire surface to the wall. It is important to keep it at a slight angle of up to 15 °.
 Drawing liquid wall-paper on walls
The material can be typed by hand and gently applied to the surface of the grater. Then transfer the wallpaper to the processed plane. You can also apply the mixture directly to the wall, and then level it. Everyone chooses the most convenient option.
Each subsequent portion should not be superimposed on the already applied. Step back a few centimeters from this place and pull the mixture to the already applied ones. It is recommended to coat one wall at a time. In this case, the wallpaper will not have time to dry out when docked with the next portion.
If you work with an internal corner, then with a trowel it is necessary to apply wallpaper from the corner and even out evenly on the surface. If with an external corner, then vice versa, to the corner. Near the floor, trowel movements should be from bottom to top, from the ceiling - from top to bottom. If your wall has sockets, switches, and the like, then apply liquid wallpaper around them first. Otherwise, you can spoil the applied layer. In this case, a transparent trowel is simply irreplaceable. You can immediately see where to press or better stretch the mixture. With such work, a small trowel will be convenient.
 Finished result on the wall
When the wall is completely ready, there may be slight roughness on the surface of the wallpaper. To eliminate them, you should take a trowel and moisten it in water, then smooth the entire area. To see such flaws, you can direct the light from the side. This will help to notice and timely eliminate all existing roughness. When the finish is completely dry, you can begin to install sockets and switches.
Liquid wallpaper
 Drawing with liquid wallpaper on the wall, looks very impressive
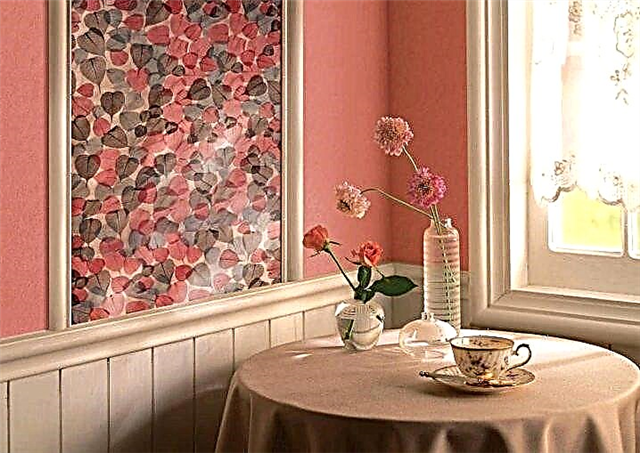
The proposed technology allows you to create beautiful drawings on the walls and ceiling. You can see original ideas in the “Photo in the Interior” section at the end of this article. It should be noted right away that drawing a drawing is quite a painstaking and lengthy process. If you do not have experience, then this may take several days. The situation may become even more complicated due to the fact that different colors and shades can be used.
So, first of all, a future drawing should be applied to a well-prepared wall / ceiling. This can be done with an ordinary pencil. Then, along the drawn contours, apply liquid wallpaper with a layer of 2-3 mm. In this case, it will be convenient to use a narrow transparent trowel with a rounded end.
If you plan to use several colors, then each color should dry well. After this, you can begin to apply the next shade. In this case, the layers will not mix with each other.
All about self-made liquid wallpaper
Liquid wallpaper or as they are also called silk plaster - an unusual material. It covers defects in the base, can be laid on the surface of any configuration, has no seams, is durable and environmentally friendly. At the same time, it has an original silky surface, making it look like fabric or felt. Not surprisingly, the cost of the material is high. Let's figure out how to make liquid wallpaper with your own hands at home. This will save the budget and get coverage that is not like any other.
Paper of any quality
You can use any raw material for making an analogue of silk plaster from paper: glossy magazines, sheets for the printer, old books, newspapers, etc. Even packaging cardboard and pressed egg trays are used. The main advantage of this choice is the minimum cost. All this can be collected in any house in the right amount. For further work, the sheets will need to be crushed. They are passed through a shredder or finely cut, the latter requires considerable labor. After soaking, a paste-like mass is obtained from them, which will become the basis for the coating.

The thickness of the paper and its quality determines how well it dissolves. This is best done with newsprint, printer sheets, etc. Laminated sheets are not suitable for this purpose.
Thick cardboard or softening trays have to be cut as finely as possible or toilet paper should be added to the viscosity solution. Another important nuance is that the color of this paste will depend on the type of raw material. So, newspapers will give a gray mass, painted with printing ink. Magazine sheets with color illustrations guarantee even richer coloring.
If you do not get rid of the gray tone, then with the subsequent tinting of the paste, it will not allow it to acquire a pure color. This is especially true for light colors. They will always be dirty. Therefore, it is desirable to carry out additional treatment with chlorine bleach. This will allow the base to get white color, which is ideal for subsequent tinting. If blank sheets for the printer are used, bleaching is not required.
Paper based paste is environmentally friendly and completely safe for allergy sufferers. Provided that no additives are added. Repairable, the coating can be removed from the wall, dissolved and reused. True, in hardened form, it resembles papier-mâché, therefore it is chosen as an analogue of inexpensive silk plaster. We offer you to watch a video about the intricacies of choosing paper raw materials.
Acrylic Putty
It is used to prepare a moisture resistant variety of material. After adding various fillers, an attractive coating with interspersed fibers is obtained. Most often, fiberglass, metal powder and pigment are added to such a paste. The result is, rather, decorative plaster.
After the material dries, it is not restored and cannot be repaired. Strong enough and moisture resistant. They can decorate bathrooms and other rooms with high humidity. Very easy to prepare. It is enough to take the finished acrylic putty and add the desired filler. It dries quickly, gains strength in a day, while a cellulose-based finish will take a week.
We use paper
Carry out a home audit and collect all paper products that will no longer be useful to you in the future. This can be newspapers, pieces of paper, magazines, old drafts printed on a printer, wrapping paper and other paper products.
Get a dye suitable for your interior color, PVA glue and gypsum.
When mixing the required solution, proceed as follows:
- Shred the paper in any suitable way. Get the kids involved in this fun activity. Remember that the sizes of pieces of paper directly affect the cooking process.
Ecowool and its analogues
The demanded insulation consists of cellulose, which forms the basis of liquid wallpaper for industrial production. Therefore, it is well suited for the independent manufacture of this finishing material. In addition, cellulose fibers are already saturated with flame retardants and antiseptics. No additional processing is required.

Ecowool is sold in the form of flakes, which are ideal for making an analogue of silk plaster. The coating is beautiful, you can experiment with the texture by introducing different fillers
It is as similar as possible to a mixture produced under industrial conditions. Sometimes instead of ecowool, ordinary cotton wool is used. It is possible, but expensive and troublesome, since the fibers need to be chopped yourself.
Sawdust and fine chips
An interesting wall decor can be obtained from a mixture based on sawdust. This is a completely natural decor, safe for humans. Its advantage can be considered attractive natural texture and varied color of the material. Painted slivers are sold in stores, they are added to the mixture after grinding. Sawdust coating has not only an attractive appearance, but also rather significant disadvantages. The tree is hygroscopic, therefore, after kneading, it absorbs water. This will significantly complicate the composition, for this reason it can slip when applied to the base. To prevent this, the proportion of glue in the solution will have to be increased. In addition, the mass will dry longer than ecowool or paper.
If necessary, you can tint sawdust with stain, giving them more or less saturated shades. A mixture of colored material has an attractive variety of tones.
As a binder, various wallpaper adhesives are used. The main thing is that they fully dissolve in water. A good choice would be:
- varieties of CMC glue. Cellulose-based products are available in dry form. Before work, diluted with water. The composition already includes antiseptics, so you do not need to add them,
- bustilate. Durable synthetic glue. Sold as a ready-to-eat paste. You can immediately enter the solution, you do not need to cook it. There are no special additives, flame retardants and antiseptics will have to be added separately.
Any of the adhesives is suitable for home decoration. They bind components well, require high-quality kneading.
Decorative filler
Used for various purposes. It is added to:
- change the invoice. To do this, choose different fibers, threads of different thicknesses, cotton balls, marble chips or dust,
- give shine. This can be done by small pieces of Christmas tree rain or tinsel, metal powder, sequins for manicure, plaster, etc.,
- add color accents. Threads of a tone contrasting to it are introduced into the solution. You can choose several different shades. It is important that the decor pigment does not dissolve in water, otherwise it will stain the entire paste.

In the process of preparing a decorative mixture, you can add only one or several types of filler. Their number is unlimited. It all depends on what effect you want to get
The degree of grinding of the components also matters. For example, metal powder and ground rain will look different. In the first case, these will be small reflections, in the second - shiny stripes.
Dye for the mixture
The tinting composition is suitable for anyone, it is important that it be universal. Such preparations are available in the form of a liquid or paste. The first option, in whatever proportion is added, will color the decorative mass evenly. The pigment is introduced into the composition and knead well. If the color is not saturated enough, add more dye. Please note that after drying, the tone will turn out to be lighter.
An important point. Universal pigment will color not only the basis of wallpaper, but also all additives, including threads, fibers, etc. In addition, the wall will be painted. This is not bad, since it allows you to get the most uniform color of the coating. But after removing the material will have to prepare the base for a new finish.

Using paste-like pigments, the coloring of the finish can be made uneven. They are added to the mixture pointwise and gently stirred. This allows you to achieve the effect of a "marble" surface.
An interesting motley color is obtained by adding colored fillers to the solution. You can hardly make them yourself, you have to buy it. It can be all kinds of sparkles, small plastic confetti, threads, etc. The pigment that gives the decor a color does not dissolve in water, so the result is a beautiful colorful coating.
How to make liquid wallpaper yourself: a universal recipe
Home masters are actively trying different methods of kneading silk plaster and share them with each other. The network has many different recipes. From them you can derive a universal formula that will "work" in any case:
- the main component is the right amount (X) kg,
- adhesive composition - 0.5X kg
- water - 5X kg
- decorative filler - the right amount,
- antiseptic according to the manufacturer's instructions.

In order not to have to redo the wall decoration, it is optimal to perform a “probe”. Put a decor on a small fragment and see how it behaves. If necessary, adjust the recipe
The solution should be prepared in this sequence.
- The crushed paper is poured with water and allowed to swell well.
- Beat the resulting mass with a construction or conventional mixer, achieving a uniform consistency.
- Different types of decorative filler are added alternately. Each time, thoroughly mix the mass. The mixer cannot be used, everything is done by hand.
- Pour glue and again mix well by hand.
- Color is added and kneaded again. The paste is ready for application.
We found out how to make liquid wallpaper at home. This is not difficult. Perhaps the biggest difficulty will be crushing large quantities of paper, threads and fibers. It will take time and labor. But you can greatly facilitate your work if you choose ecowool and ready-made decorative filler. Their cost is relatively small, but the result is sure to please.
How to make liquid wallpaper from improvised materials
- waste paper (paper, cardboard or newspapers),
- water,
- tinting liquid
- PVA glue,
- gypsum.
Waste paper should not contain glue and other additives that may enter into unforeseen reactions with other components. Also, it should be without metal elements: staples, paper clips and a folder, which can cause rust spots.

Colorless paper is recommended. The ideal option is to use white stationery.
The technology for manufacturing liquid wallpaper at home involves the following steps:
- paper cutting
- pouring it into a plastic container,
- coating pieces of paper with warm and clean water,
- for 1 kg of paper you need 5 l of water,
- in 2-3 hours, the paper will completely soak,
- grinding the mortar with a construction mixer,
- should get a mass similar to cold semolina,
- gypsum and PVA glue are added to improve adhesion.
To give the liquid wallpaper a specific color cast, tinting liquid is added to them. This is done in this way. First, a small amount of liquid should be added to the wallpaper. The mixture is stirred with a mixer.
If the desired shade does not work out, color is added yet. The solution is also thoroughly mixed. It should be noted that after the applied liquid wallpaper dries, the color will become paler. Therefore, when tinting the mixture, the color intensity should be significantly higher than the planned shades.

If a dry solution is obtained, then water is added to it. When making a too wet mixture, wait until the excess water evaporates. You can embellish liquid wallpaper by adding sparkles, mica, mineral chips, mother of pearl and other components.
Preparation of liquid wallpaper for surface repair
Sometimes you may encounter the fact that in a room decorated with liquid wallpaper, it is necessary to change the wiring. In this case, you will have to remove a certain section of liquid wallpaper. To do this, you need a spray bottle, clean water and a wide spatula.
Soaked liquid wallpaper is collected in plastic dishes. After laying the wiring and puttying of the strob and seams, the area is covered with two layers of primer. The extreme parts of the liquid wallpaper on the surface are wetted with a spray gun.
To close up the area with electrical wiring, a new solution of liquid wallpaper is being prepared. Moreover, material is used that was removed from the wall (or ceiling) and placed in plastic dishes. Old wallpapers are diluted with water and applied to the surface again.
Video about making liquid wallpaper with your own hands:
From fibrous materials
To prepare the mixture, you can use other components from the fibers that will do the job perfectly. For example, sawdust is a popular material for making liquid wallpaper. The main thing is to experiment. Let's take a quick look what else can be used instead of paper:
- Cotton or cellulose fiber - insulation material from wood pulp. This component must be carefully ground in any suitable way. Only now it should be taken in large quantities, especially if it is supposed to cover a large area with liquid wallpaper.
As a bonding component, it is better to use acrylic putty. pre-bred in water. Dyes use the same as in the preparation of wallpaper from paper. Using yarn will achieve a uniform and suitable shade. In extreme cases, you can attach to the business only white yarn.
Other tips
The general tips in preparing the composition include:
- the main component for preparing the mixture should be approximately equal amounts with a binder,
- to achieve a more liquid consistency, after adding gypsum, you can add warm water,
- make several parts of liquid wallpaper of different consistencies and apply them on the wall, studying the “nature of their behavior” in the future,
- Be sure to withstand the composition for several hours after adding the adhesive component.
Can I paint?
We used dye to give the desired color to our liquid wallpaper. But there is another way - leave them white, apply, and only then paint.
Generally, you can paint liquid wallpaper, and sometimes it is necessary, for example, in places where the furniture touches the wall. Here use ordinary paint for painting walls and a tool more convenient for the master.
Briefly about application technology
Here you must follow a few rules to create an attractive effect and a positive result.
The composition is applied in the same way as decorative plaster with a spatula and other painting and plastering tools. But if you think about the issue, which is better - liquid wallpaper or decorative plaster, professional finishers recommend giving preference to the first option, since it has a number of undeniable advantages.
As well as with decorative plaster, before application, some work needs to be done.
Wall preparation
While the mixture reaches the desired consistency, you can do the preparation of the walls for such a kind of sticking.
To get started, clean the surface of the old coating. If under the old wallpaper there is a layer of plaster without significant flaws, the walls do not need to be primed. To apply any additional layer is also not required, you can immediately proceed to pasting.
Primer walls for liquid wallpaper is necessaryif, after removing the old coating, a bare concrete base remains. At the initial stage, when preparing the surface, it will be necessary to apply a penetrating primer to the concrete, and after it has completely dried, treat the walls with a putty leveling mixture.
But there is no need to apply the finishing putty. The ceiling is prepared according to the same principle.
Conclusion
So, preparing liquid wallpapers yourself is not so difficult. We examined what can be used for the main filler, most often it is unnecessary paper, but there are a lot of options. They can be made of any color using dye, or by painting after application. You can create seamless patterns. Suitable for wall decoration in any room. This is the most environmentally friendly material and can be the cheapest if everything is done from improvised means.
Use liquid wallpaper for your imagination, and your interior design will sparkle with new colors.